This is the first of the multipart tutorial of how to scrape a website using scrapy framework.
Scrapy is a framework used to extract the data from websites.
This tutorial will help you get started with scrapy framework in 5 easy steps.
1. Start a new Scrapy Project
Switch to your virtual environment and install the scrapy using this command:
pip install ScrapyNow create a scrapy project using the following command.
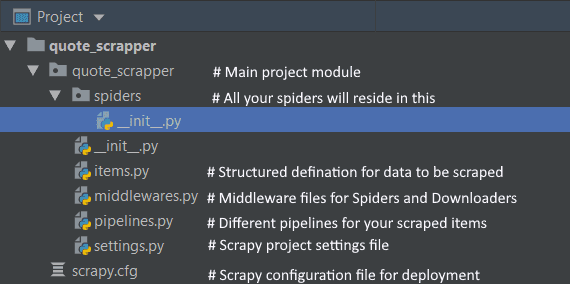
scrapy startproject quote_scrapper2. Scrapy files explained
The brief use of the files is illustrated in the image below. We will explore each of these in upcoming posts as we will discuss more about settings, pipelines, and deployment.
3. Creating your first spider
Without further ado, let's jump in and create your first spider. We will use quotes.toscrape.com (a site provided by scrapinghub to learn scrapy) to create our first spider. quotes.toscrape.com contains the collection of quotes, which is perfect for the first spider as the site provides pagination and filters based on tags.
- First create a file under the spiders directory quotes_spider.py
- Add the following lines of code to your file
import scrapy


class QuotesSpider(scrapy.Spider):
    name = 'quotes_spider'
    start_urls = [
        'http://quotes.toscrape.com/',
    ]

    def parse(self, response):
        for quote in response.css('div.quote'):
            yield {
                'quote': quote.css('span.text::text').get(),
                'author': quote.xpath('span/small/text()').get(),
                'tags': quote.css('a.tag::text').extract()
            }

        next_page = response.css('li.next a::attr("href")').get()
        if next_page is not None:
            next_page = response.urljoin(next_page)
            yield scrapy.Request(next_page)
4. Understanding your first spider
Now, let's go line by line and understand what is going on.
- First, we have created a new Class called QuotesSpider. To create a spider, your class must inherit from scrapy.Spider. This Spider class contains the definition of how to scrape a particular website.
- Second is the name attribute. name is just the name given to a spider and it must be unique for all the spiders in your project.
- start_urls is the list of URLs that you to start your scrapper from.
- parse method is the main driver of a spider. After your page is downloaded, it comes to the parse method as a response, then you can extract different details from the page that you need.
- We have used two selectors in this spider css selector and xpath selector. Xpath selector is used to select a particular node in the HTML document. Css selector is used to select items based on CSS definitions.
- If you've extracted all the information, you need to yield the item.
- After you have extracted all the data from the response then you should look for the next pages. If the next page is present just yield the scrapy.Request object again with the new URL.
5. Testing your spider
Now run the following command. It will start the crawling process and keeps storing the items in the JSON file.
scrapy crawl quotes_spider -o quotes.jsonJaskaran Singh
We, at Inkoop, have specialization in Web development and Cloud Operations. If you want us to work with you, contact us.


