


Whether you're starting your e-commerce journey or planning to shift your whole business online, Shopify is a great place to start. And as your business evolves Shopify has all the resources to help you grow along with it. It takes the pain of setting up the store, authentication, payment, etc., and lets you focus on the do your business.
But when it comes to customizing a Shopify Store. Your options are very limited. It is also very difficult if you want to extend your store. Or want to add more pages but with custom design or manage other aspects of your site somewhere else.
Solution
One great way to overcome these issues is to set up and manage your store on Shopify but have a separate front-end built using any static site generator, and Gatsby stands out to be one of the best options. Here we're going to look at how can we integrate a Gatsby website with Shopify to show products and enable users to make purchases as well.
Setup your store
If you already haven't set up your Shopify store you need to do that first. Add your products, build your collections, and do all the basic setup needed.
Create Private App
Once your store setup is done you need to create a private app in your Shopify Store. You must have admin access to do this step. This private app will let you access your products and cart from the Gatsby Site.
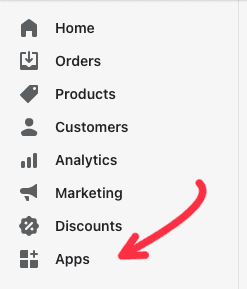
To Create a private app you need to navigate to Apps Section of your store.
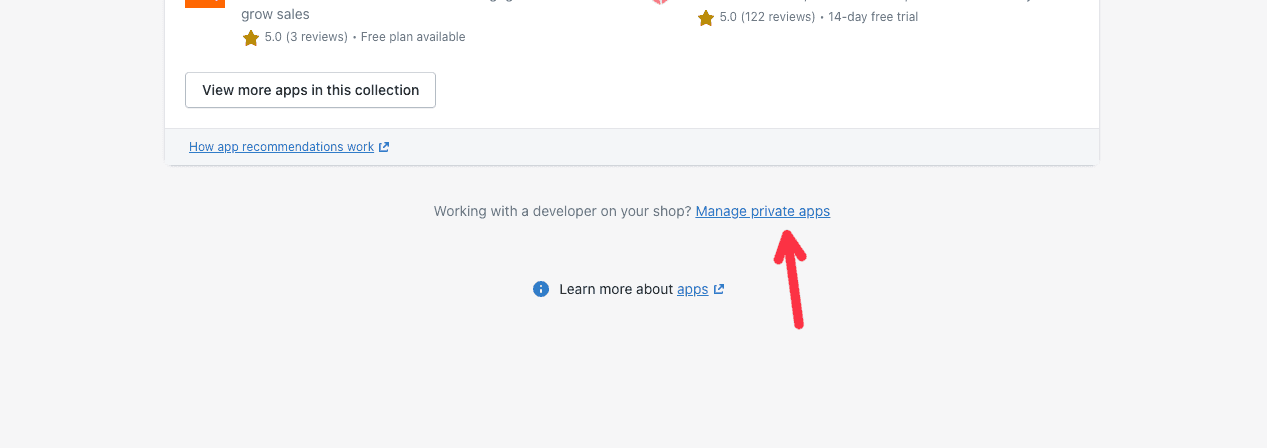
then goto Manage Private Apps link.
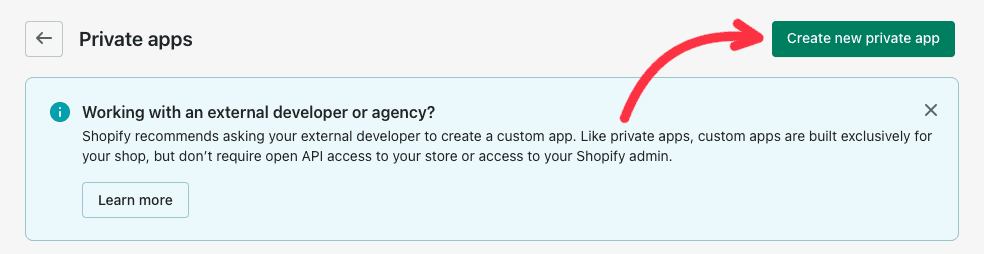
Then click on Create Private Apps
Now Enter Private app name, down at the end of the page you need to check Allow this app to access your storefront data using the Storefront API. Then click on the Save button. That will generate a Storefront access token. That's the token we'll need to set up our front-end. So keep that safe 😉
Now that's done we can start with integrating Gatsby with our Shopify Store.
Gatsby Integration
We'll start with GraphQL Integration to build the pages for our products.
Install required packages
npm install gatsby-source-shopify shopify-buyGatsby Config
{
resolve: `gatsby-source-shopify`,
options: {
// The domain name of your Shopify shop.
shopName: `my-store`,
// The storefront access token
accessToken: `c1cba2ee5e15c77f26904b030369aln2`,
},
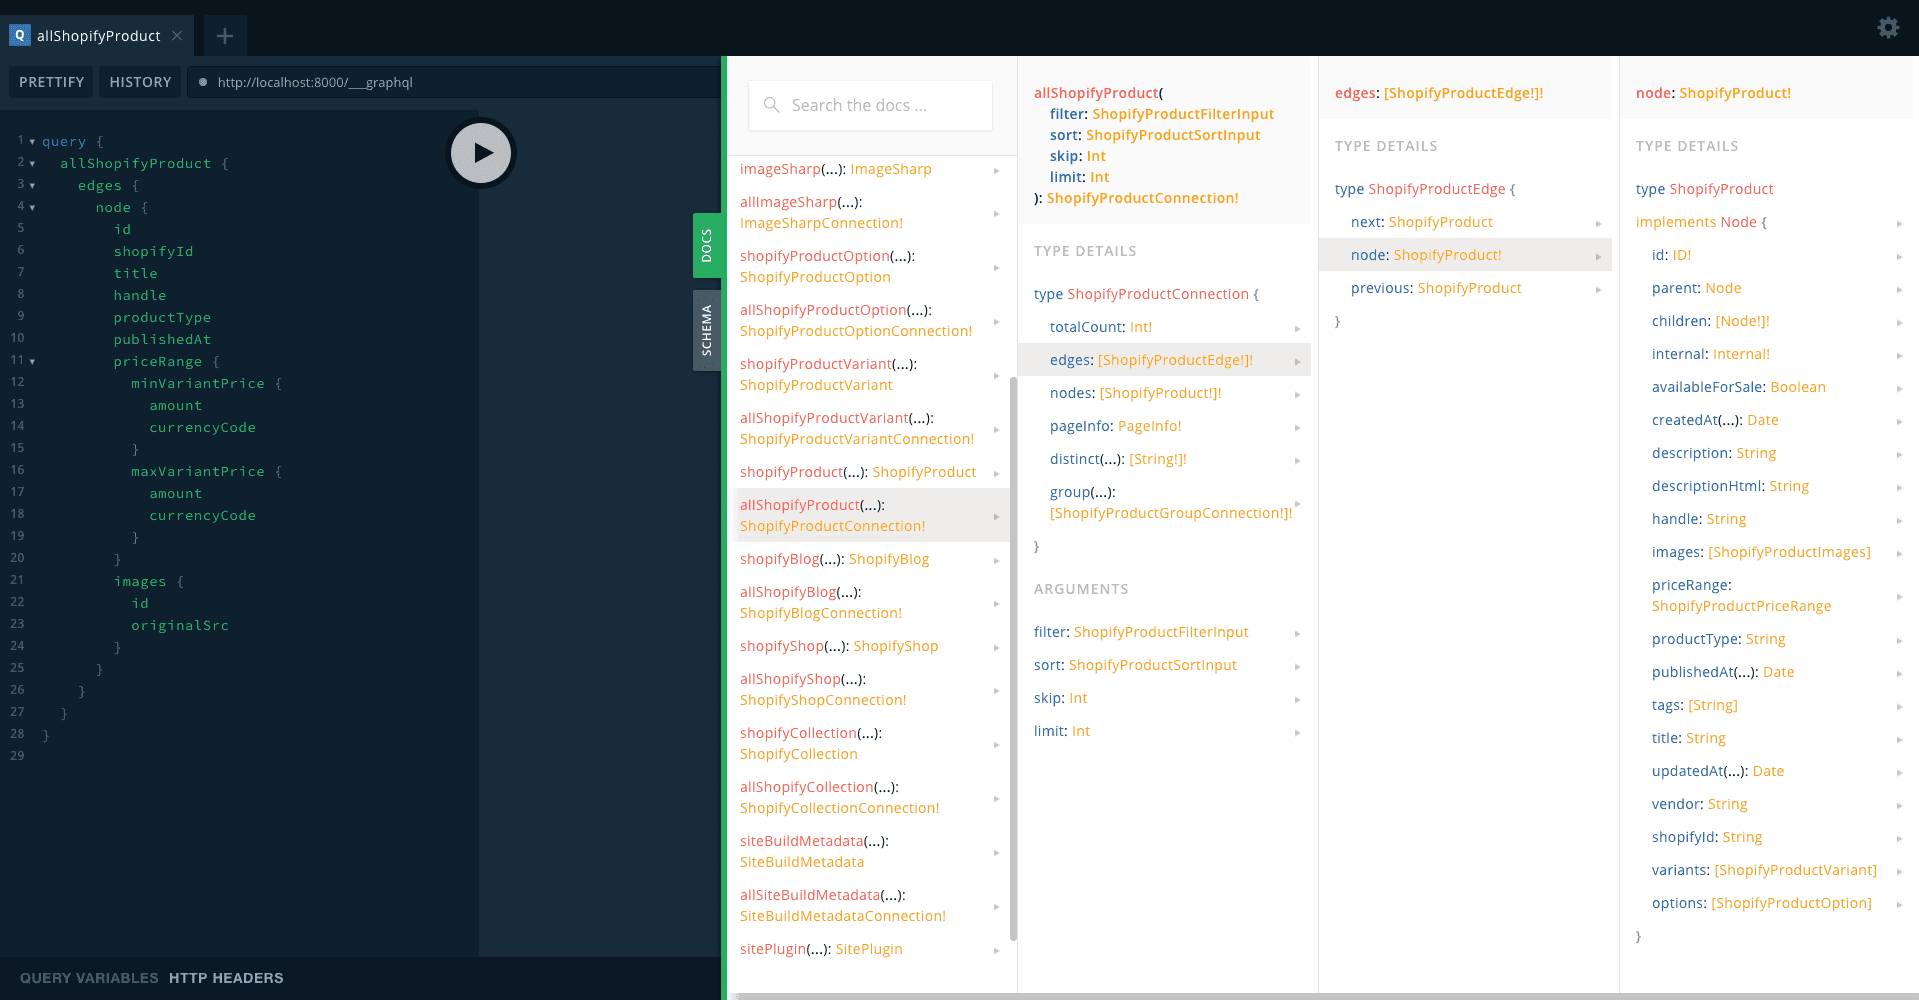
},Now once the setup is done you should be able to query your products from GraphiQL or GraphQL Playground(learn how to use GraphQL Playground as default explorer in Gatsby).
Start your development server(you might need to clear your cache) and head out to http://localhost:8000/__graphql.
Build your template
Now that you have figured out the available queries and options to fetch your data, It's time to build a template to render your products.
import React from "react"
import { graphql } from "gatsby"
import PropTypes from "prop-types"

import SEO from "../components/seo"

import ProductDescription from "../components/Product/ProductDescription"

const Product = ({ data }) => {
  const { shopifyProduct, allShopifyProduct } = data

  return (
    <React.Fragment>
      <SEO path={shopifyProduct.handle} title={shopifyProduct.title} />
      <ProductDescription shopifyProduct={shopifyProduct} />
    </React.Fragment>
  )
}

export const postQuery = graphql`
  query ShopifyProductById($id: String!) {
    shopifyProduct(id: { eq: $id }) {
      id
      shopifyId
      handle
      title
      tags
      descriptionHtml
      publishedAt
      productType
      priceRange {
        minVariantPrice {
          amount
          currencyCode
        }
        maxVariantPrice {
          amount
          currencyCode
        }
      }
      variants {
        title
        shopifyId
        price
        priceV2 {
          amount
          currencyCode
        }
        selectedOptions {
          name
          value
        }
      }
      images {
        id
        originalSrc
      }
    }
  }
`

Product.propTypes = {
  data: PropTypes.object.isRequired,
}

export default Product
Build Product Pages
We can use these queries to fetch our products and build pages from our template. If you want to skip build for any of the pages you can do that as well.
// gatsby-node.js

const path = require("path")

const query = `
{
  allShopifyProduct {
    edges {
      node {
        id
        handle
      }
    }
  }
}
`
exports.createPages = async ({ graphql, actions }) => {
  const { createPage } = actions

  const res = await graphql(query)
  res.data.allShopifyProduct.edges.map(edge => {
    createPage({
      path: `/shop/${edge.node.handle}/`,
      component: path.resolve("./src/templates/product.js"),
      context: {
        id: edge.node.id,
      },
    })
  })
}
After this, your need to start/restart your Gatsby Development server, which will generate all of your products pages.
Now that our product pages are built let's start with integrating Shopify Buy SDK to add Dynamic Functionality
Shopify Buy SDK(Dynamic Functionality)
Using the gatsby-source-shopify we have successfully built our product pages. But that will not work if we want to add any dynamic functionality like shopping cart, search, etc. To add dynamic functionality we need to add and integrate shopify-buy SDK.
In your layout file of your project you can import and initialise the SDK
/*.  src/layout/index.   */

import React from "react"
import PropTypes from "prop-types"
import Client from "shopify-buy"

class Layout extends React.Component {
  componentDidMount() {
    this.client = Client.buildClient({
      domain: "my-store.myshopify.com",
      storefrontAccessToken: "c1cba2ee5e15c77f26904b030369aln2",
    })
    this.client.checkout.create().then(checkout => {
      // Do something with the checkout
      this.setState({ checkout })
    })
  }

  // add your methods here

  render() {
    // return JSX
  }
}
The client object in our layout will have access to our Shopify store. Using that we can add various dynamic features. Let's look at how we can implement cart functionality using Shopify buy SDK.
Cart Integration
Initialise required state variables
state = {
  isCartOpen: false, // to show cart when any product is added
  cartRequest: false,
  checkout: { lineItems: [] },
  products: [],
  shop: {},
}
Add methods to add product to cart, remove product from cart and update quantity
_addVariantToCart(variantId, quantity) {
  this.setState({ isCartOpen: true, cartRequest: true })

  if (variantId.indexOf('Shopify__ProductVariant__') !== -1)
    variantId = variantId.split('Shopify__ProductVariant__')[1]

  const lineItemsToAdd = [{variantId, quantity: parseInt(quantity, 10)}]
  const checkoutId = this.state.checkout.id

 return this.client.checkout.addLineItems(checkoutId, lineItemsToAdd)
    .then(checkout => this.setState({ checkout, cartRequest: false }))
}

_updateQuantityInCart(lineItemId, quantity) {
  const checkoutId = this.state.checkout.id
  const lineItemsToUpdate = [{id: lineItemId, quantity: parseInt(quantity, 10)}]
  this.setState({ isCartOpen: true, cartRequest: true })
  return this.client.checkout.updateLineItems(checkoutId, lineItemsToUpdate)
    .then(checkout => this.setState({ checkout, cartRequest: false }))
}

_removeLineItemInCart(lineItemId) {
  const checkoutId = this.state.checkout.id
  this.setState({ isCartOpen: true, cartRequest: true })
  return this.client.checkout.removeLineItems(checkoutId, [lineItemId])
    .then(checkout => this.setState({ checkout, cartRequest: false }))
}
Once all your methods and states are defined you need to pass them down to your page components to make them accessible.
render() {
  let { children } = this.props
  const { checkout, isCartOpen, cartRequest } = this.state

  children = React.Children.map(children, (child) =>
    React.cloneElement(child, {
      addVariantToCart: this._addVariantToCart.bind(this),
      updateQuantityInCart: this._updateQuantityInCart.bind(this),
      removeLineItemInCart: this._removeLineItemInCart.bind(this),
      checkout: checkout,
    })
  )
  return (
    <React.Fragment>
      <Header
				cartRequest={cartRequest}
				cartCount={checkout.lineItems.length}
			/>
      <main>{ children }</main>
      <Footer />
    </React.Fragment>
  )
}
Final File
/* Your site layout file
 -> src/layout/index.js
*/

import React from "react"
import PropTypes from "prop-types"
import Client from "shopify-buy"

import Header from "../components/header"
import Footer from "../components/footer"

import "../assets/scss/main.scss"

class Layout extends React.Component {
  state = {
    isCartOpen: false,
    cartRequest: false,
    checkout: { lineItems: [] },
    products: [],
    shop: {},
  }
  componentDidMount() {
    this.client = Client.buildClient({
      domain: "my-store.myshopify.com",
      storefrontAccessToken: "c1cba2ee5e15c77f26904b030369aln2",
    })
    this.client.checkout.create().then(checkout => {
      // Do something with the checkout
      this.setState({ checkout })
    })
  }
  _addVariantToCart(variantId, quantity) {
    this.setState({ isCartOpen: true, cartRequest: true })

    if (variantId.indexOf("Shopify__ProductVariant__") !== -1)
      variantId = variantId.split("Shopify__ProductVariant__")[1]

    const lineItemsToAdd = [{ variantId, quantity: parseInt(quantity, 10) }]
    const checkoutId = this.state.checkout.id

    return this.client.checkout
      .addLineItems(checkoutId, lineItemsToAdd)
      .then(checkout => this.setState({ checkout, cartRequest: false }))
  }

  _updateQuantityInCart(lineItemId, quantity) {
    const checkoutId = this.state.checkout.id
    const lineItemsToUpdate = [
      { id: lineItemId, quantity: parseInt(quantity, 10) },
    ]
    this.setState({ isCartOpen: true, cartRequest: true })
    return this.client.checkout
      .updateLineItems(checkoutId, lineItemsToUpdate)
      .then(checkout => this.setState({ checkout, cartRequest: false }))
  }

  _removeLineItemInCart(lineItemId) {
    const checkoutId = this.state.checkout.id
    this.setState({ isCartOpen: true, cartRequest: true })
    return this.client.checkout
      .removeLineItems(checkoutId, [lineItemId])
      .then(checkout => this.setState({ checkout, cartRequest: false }))
  }

  render() {
    let { children } = this.props
    const { checkout, isCartOpen, cartRequest } = this.state

    children = React.Children.map(children, child =>
      React.cloneElement(child, {
        addVariantToCart: this._addVariantToCart.bind(this),
        updateQuantityInCart: this._updateQuantityInCart.bind(this),
        removeLineItemInCart: this._removeLineItemInCart.bind(this),
        checkout: checkout,
      })
    )
    return (
      <React.Fragment>
        <Header
          cartRequest={cartRequest}
          cartCount={checkout.lineItems.length}
        />
        <main>{children}</main>
        <Footer />
      </React.Fragment>
    )
  }
}

Layout.propTypes = {
  children: PropTypes.node.isRequired,
}

export default Layout
Now, these methods will be accessible from your Header and Page components, all your need to do is call these methods and all the dynamic functionality will be added. This API is compatible with Gatsby Source API so you can use the same product id, field names etc.
Hope this article helped you in building your e-commerce store by integrating your Shopify Store into your Gatsby Site. I would encourage you to check out full documentation of Gatsby Source Shopify to learn more about available GraphQL Queries to fetch product collections, terms and conditions, pages, and other types of content from your store. You can also checkout Shopify Buy SDK in detail to learn about available methods and features in the API.
Gatsby Shopify Plugin : https://www.gatsbyjs.com/plugins/gatsby-source-shopify/
Shopify Buy SDK: https://www.npmjs.com/package/shopify-buy
Shopify Storefront API: https://shopify.dev/tools/libraries/storefront-api/javascript


