


Why dashboards are helpful?
Let's start with, what are dashboards? In a digital paradigm dashboards are virtual boards (or spaces) that display vital information on a specific topic. Traditionally (but not mandatorily) dashboards exhibit vital information in tabular and graphical representation.
For a business, dashboards are more commonly associated with data management and analysis. This brings us to the question, why are dashboards helpful? Every business, over time, accumulates a bulk of data—say it be from the customer's end or production's end. Not all of the stored data is vital. More importantly, not all of the data comes in handy in developing meaningful insights that propel sales and revenue.
Dashboards can be used as a space to pin multiple, vital and relevant, data (or data query) that can collectively yield a meaningful conclusion. This helps in building an accurate overview of a specific business function or the business productivity as a whole. This is why dashboards are preferred by management professionals as an important instrument of data analysis ( and consequently business evaluation.) To summarize, dashboards are beneficial due to the following reasons:
- Relevant and conclusive data.
- Time-saving - A glance through the dashboard can develop a broad overview of the progress.
- Eliminate the hassle of building repetitive data queries.
- Live update on vital data queries - data queries on dashboards can refresh automatically and update, to sync with changes in the database.
- A compelling view of the data with visual representations like - tables, charts, and graphs.
Building an effective dashboard.
The central idea of the dashboard is to communicate effectively with its viewers. To achieve this central goal different dashboard building parameters are taken into consideration—like, visual representations, data relevancy, visual tidiness, and message clarity. Traditionally a dashboard is expected to be less crowded, with only pivotal information that conveys the right message and initiates action.
1. Data relevancy
Data relevancy can be considered a primary building block of your dashboard. When building your dashboard, aim to include data queries that yield the most vital information, and maximize the clarity of the message you wish to convey.
2. Data Story-telling
In a world overflowing with data, believe it or not, Data Storytelling is a thing! And, it is a highly revered data science skill. For example, say you are evaluating an annual sales report. And the numbers suggest that Sales have dropped in the last two quarters. Simultaneously, say the data also suggests, that certain operational and marketing function changes can be associated with the drop in sales. Now in this case use all the relevant data from sales, marketing, and operations, to establish a narrative—how the new changes in marketing and operations, have led to a drop in sales.
Information without a narrative is just information open to many interpretations. With the narrative, you embellish an insight that helps initiate actionable measures to eliminate impediments.
3. Clarity of message
Make sure the information you put up on the dashboard is to the point and gets your narrative straight. Do not crowd your dashboard with distracting information that pulls attention away from the central message of your narrative. Build your dashboard with data that complement each other, instead of contradicting.
4. Utilize the visual representation tools
Visual representations save time and leave a greater impact. Although numbers build the base required for the logical analysis of reality—visual representations help the human mind aptly adjust to the implications of reality.
5. Prepare your data
It is always wise to keep your data sorted and filtered. Your database is often a huge source of information—where every single bit of information might not be relevant. When you run your query on a particular chunk of data, you must ensure it is free of irrelevant data. Irrelevant data can otherwise reduce the accuracy of your analysis. Thus before you start your analysis, keep your data prepared—with irrelevant data filtered out, and the relevant ones sorted in order.
6. Use the dashboard building tools appropriately
You must also give a fair bit of thought to choosing the right data analysis platform. A platform that gives you the right tools to build an effective dashboard. A platform that has customization flexibility in dashboard building, a thorough structure in query building, and strong data visualization ability.
What is Draxlr?
Draxlr is an advanced Database management and Data analytics platform. Draxlr allows you to run complex data queries, build dashboards, save queries, and export data. Draxlr is compatible with databases—like, Postgres, MySQL, MS SQL, Oracle, MariaDB, SQLite3, and Amazon Redshift.
Draxlr, as Database management and analysis platform, will help you make queries on your existing database and fetch critical data-oriented information. Information that can be processed to develop meaningful business insights—for growth and development.
Draxlr is sincerely user-friendly with its no-code query builders (although raw SQL queries can be executed if one needs to,) and compelling visual representations of the data. The platform also features a customizable dashboard, to highlight the most relevant information.
Signup now to make better business decisions with Draxlr!
1. Data Analysis with Draxlr
Draxlr helps you make better business decisions with data analysis. The data analysis of draxlr is integrally bound to its advanced query building ability. The Draxlr query builder can make intuitive queries—to sort and identify complex relations between different tables—establishing new meaningful information. The information can be plotted into graphs and charts, and conveniently analyzed.
2. Dashboard building with Draxlr
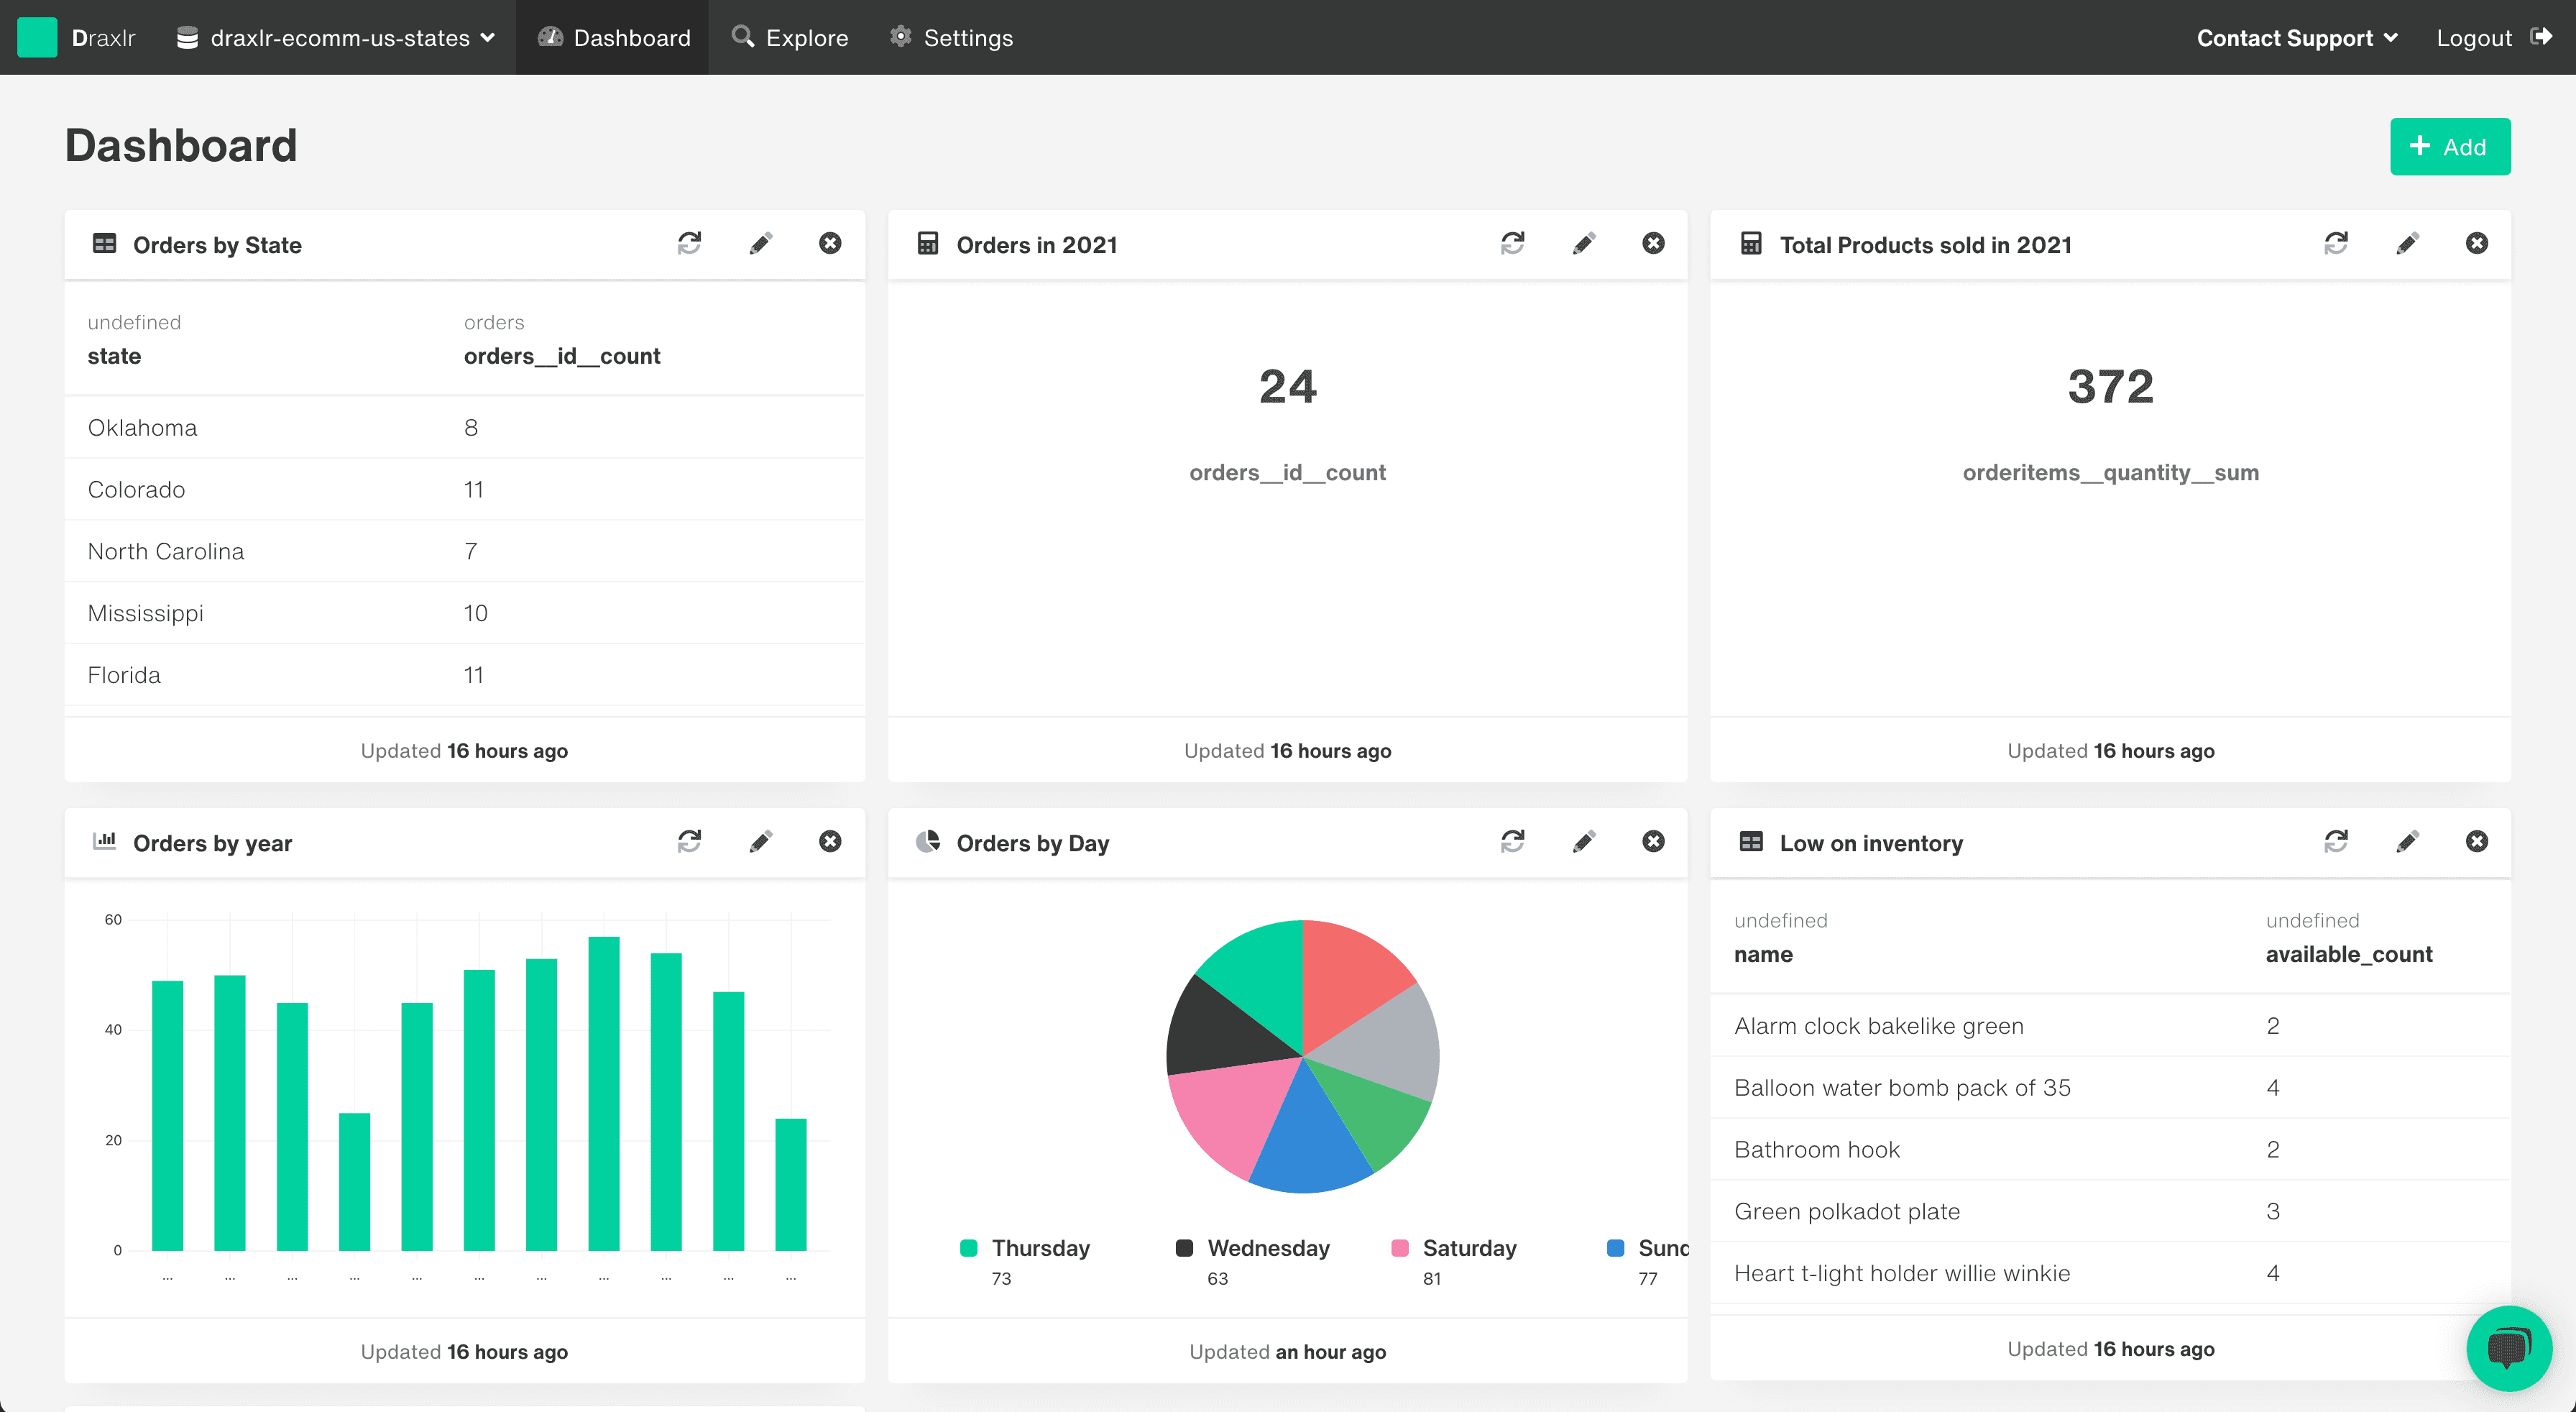
With up to 100 dashboard elements and convenient customization options, you can build an agile dashboard in Draxlr. The platform can save your queries, which comes in admirably handy while building a dashboard. The dashboard can feature data in a wide variety of visual representations—tables, charts, and graphs. This not only makes the Dashboard visually flexible but also accommodates visual representation for a wide variety of information. Draxlr dashboard also enables you to customize the refresh (update) frequency of the displayed information.
3. Data Monitoring with Draxlr
With the auto-updating dashboard, visually represented data, and advanced query-fetched information—regularly monitoring your Key Performance Indicators, will prove convenient. Draxlr can help reduce the time and hassle involved in data monitoring. You can also invite team members who need access to data monitoring and customize their admin panel as per their (and your) requirements.
How to set up dashboards in Draxlr?
By now we have sufficiently covered the importance of the dashboard, which brings us to our final concern—how to set up dashboards in Draxlr. The dashboard building of Draxlr is highly agile. It excels in several areas like—quantity of dashboard elements, data visualization tools, automated data update, convenient dashboard modifications, and data relevancy. Appropriately use the dashboard building features of Draxlr, to build a dashboard that precisely conveys your message.
Step 1 — Query building
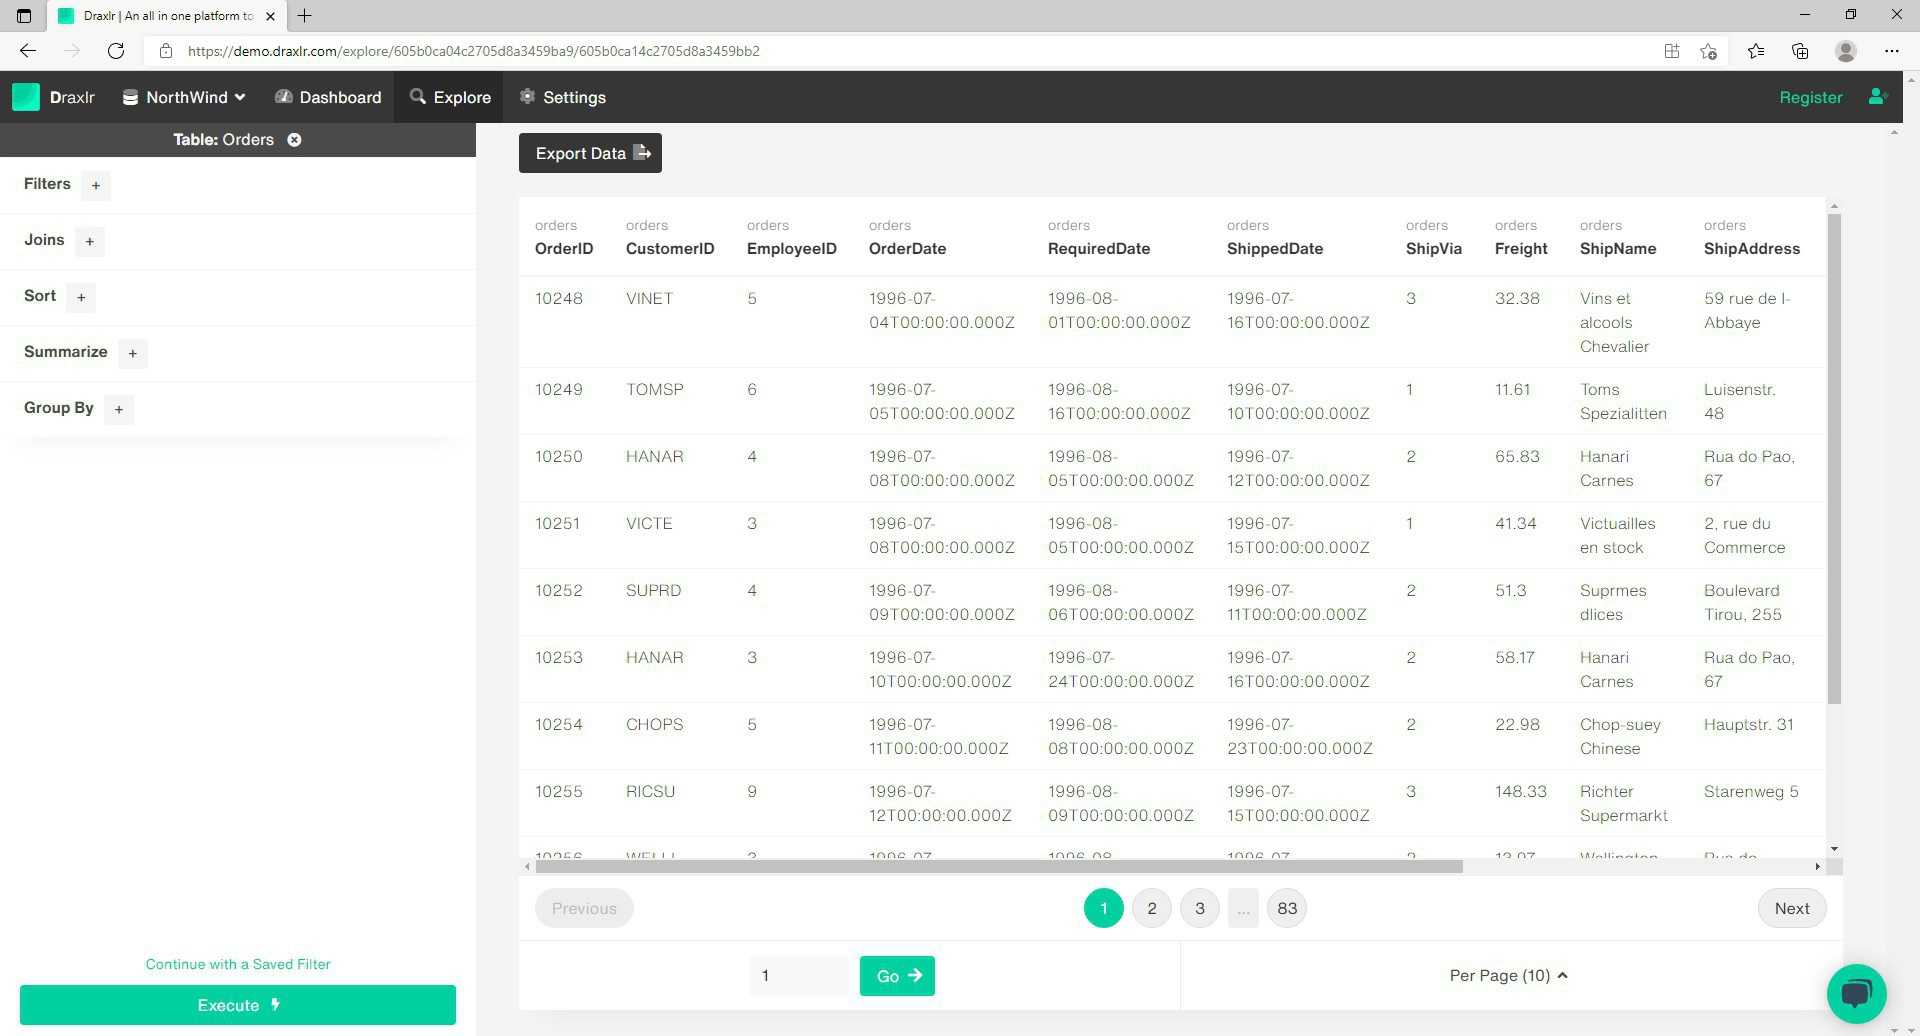
Query building is the core feature of Draxlr, with the entire platform being built around this functionality. Even in terms of building the dashboard, the data relevancy and the data storytelling depend on how well you utilize the Query building function. Draxlr can introduce non-technical professionals to the realm of query building and database management, with table-based code-free query building. For convenience's sake let's see how to build a dashboard, using the demo App available on Draxlr.
- First, select the relevant database source from the toolbar.
- Then head to explore on the toolbar.
- This will open up a panel of tables to the left of the screen.
- The data in each table can be queried using five different tools—Filters, Joins, Sort, Summarize, and Group by. Let's first evaluate the Filter tool.
A. Filters
- Select the table "order," it opens up the left panel into the five (above-mentioned tools.)
- The central space exhibits the data for the table order. The table has different attributes (or columns) like, order ID, Customer ID, Employee ID, order date, Ship City, Ship Country, and So on.
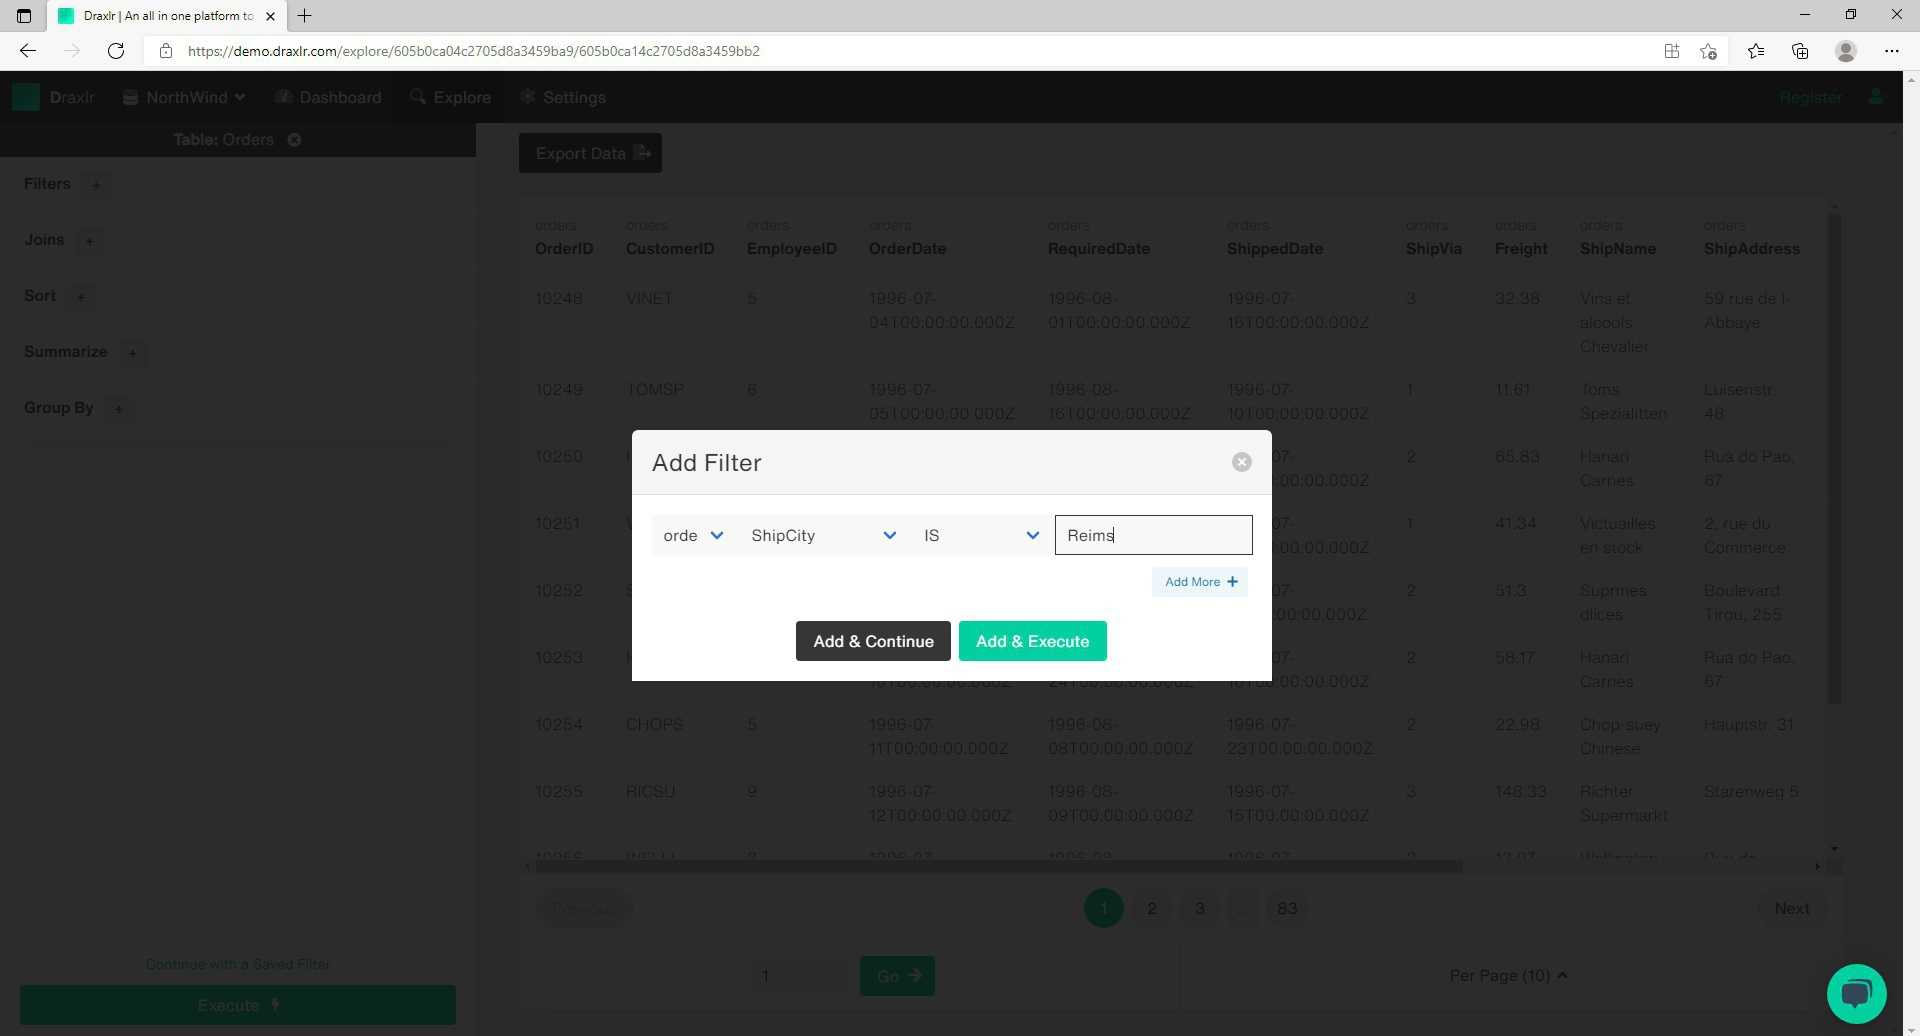
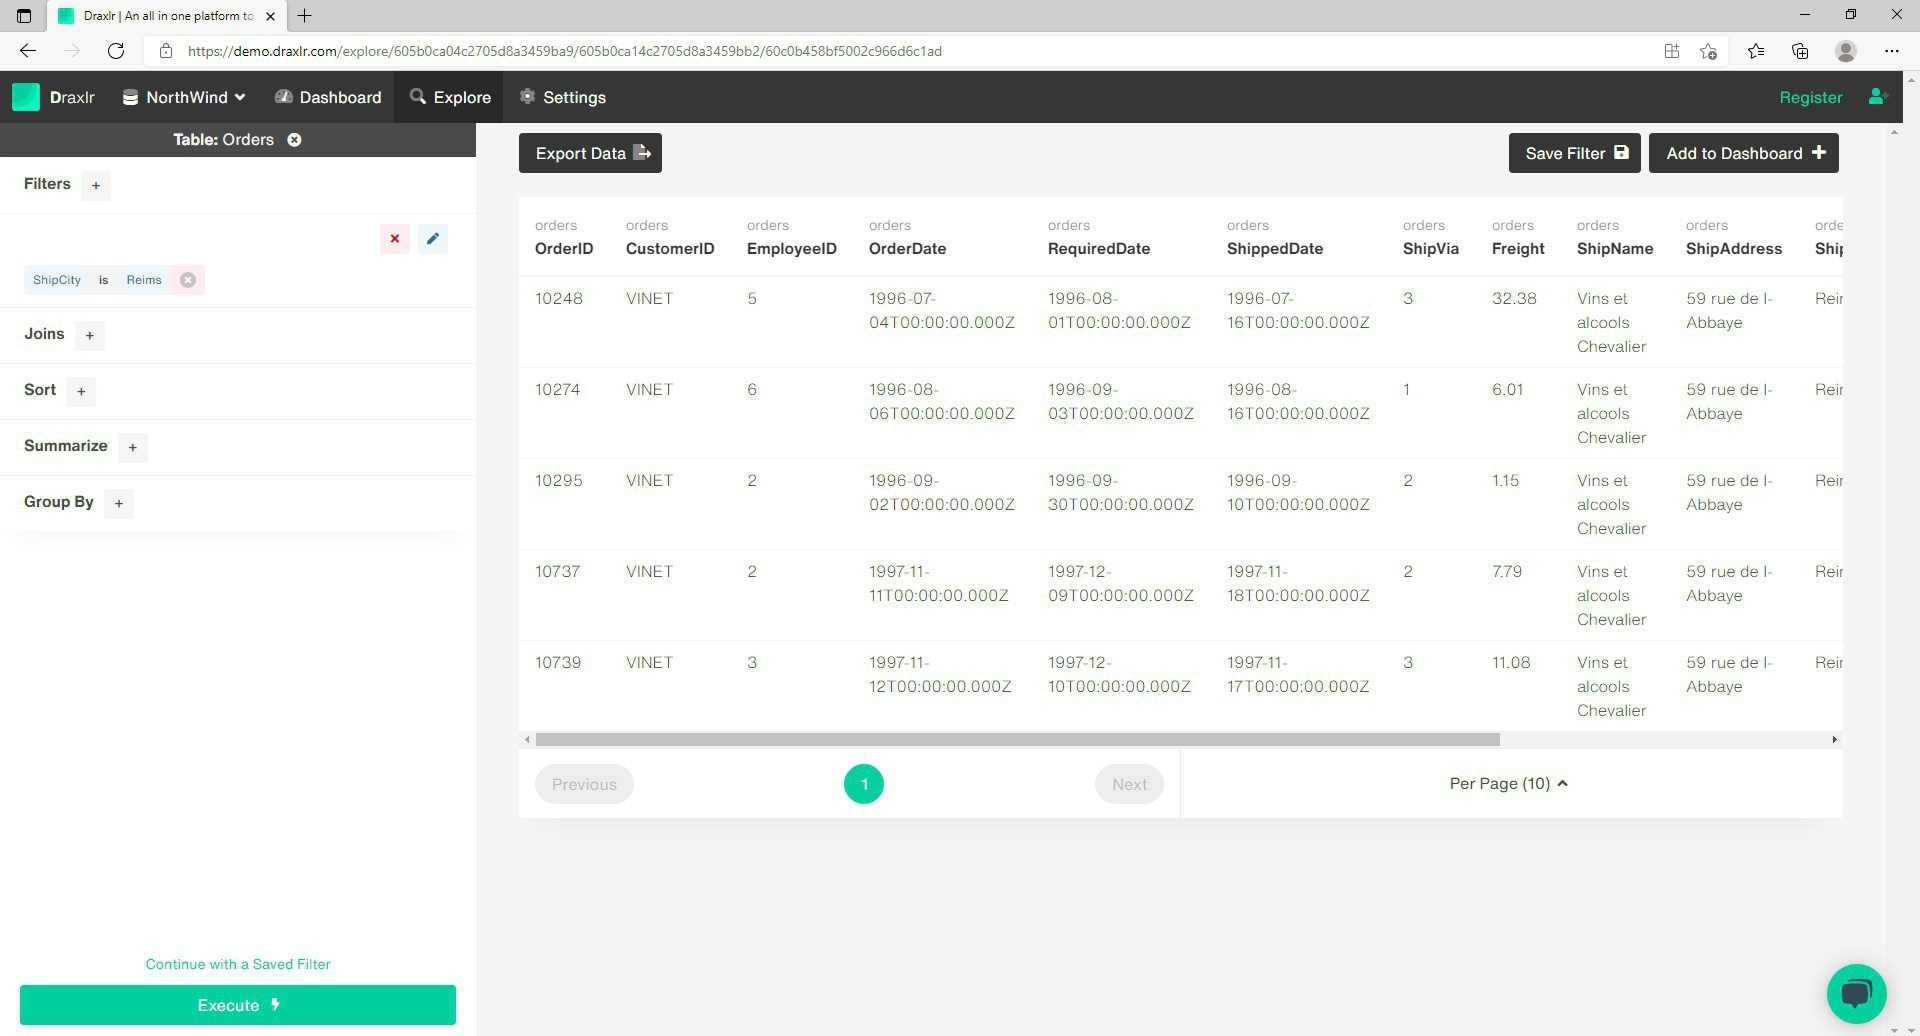
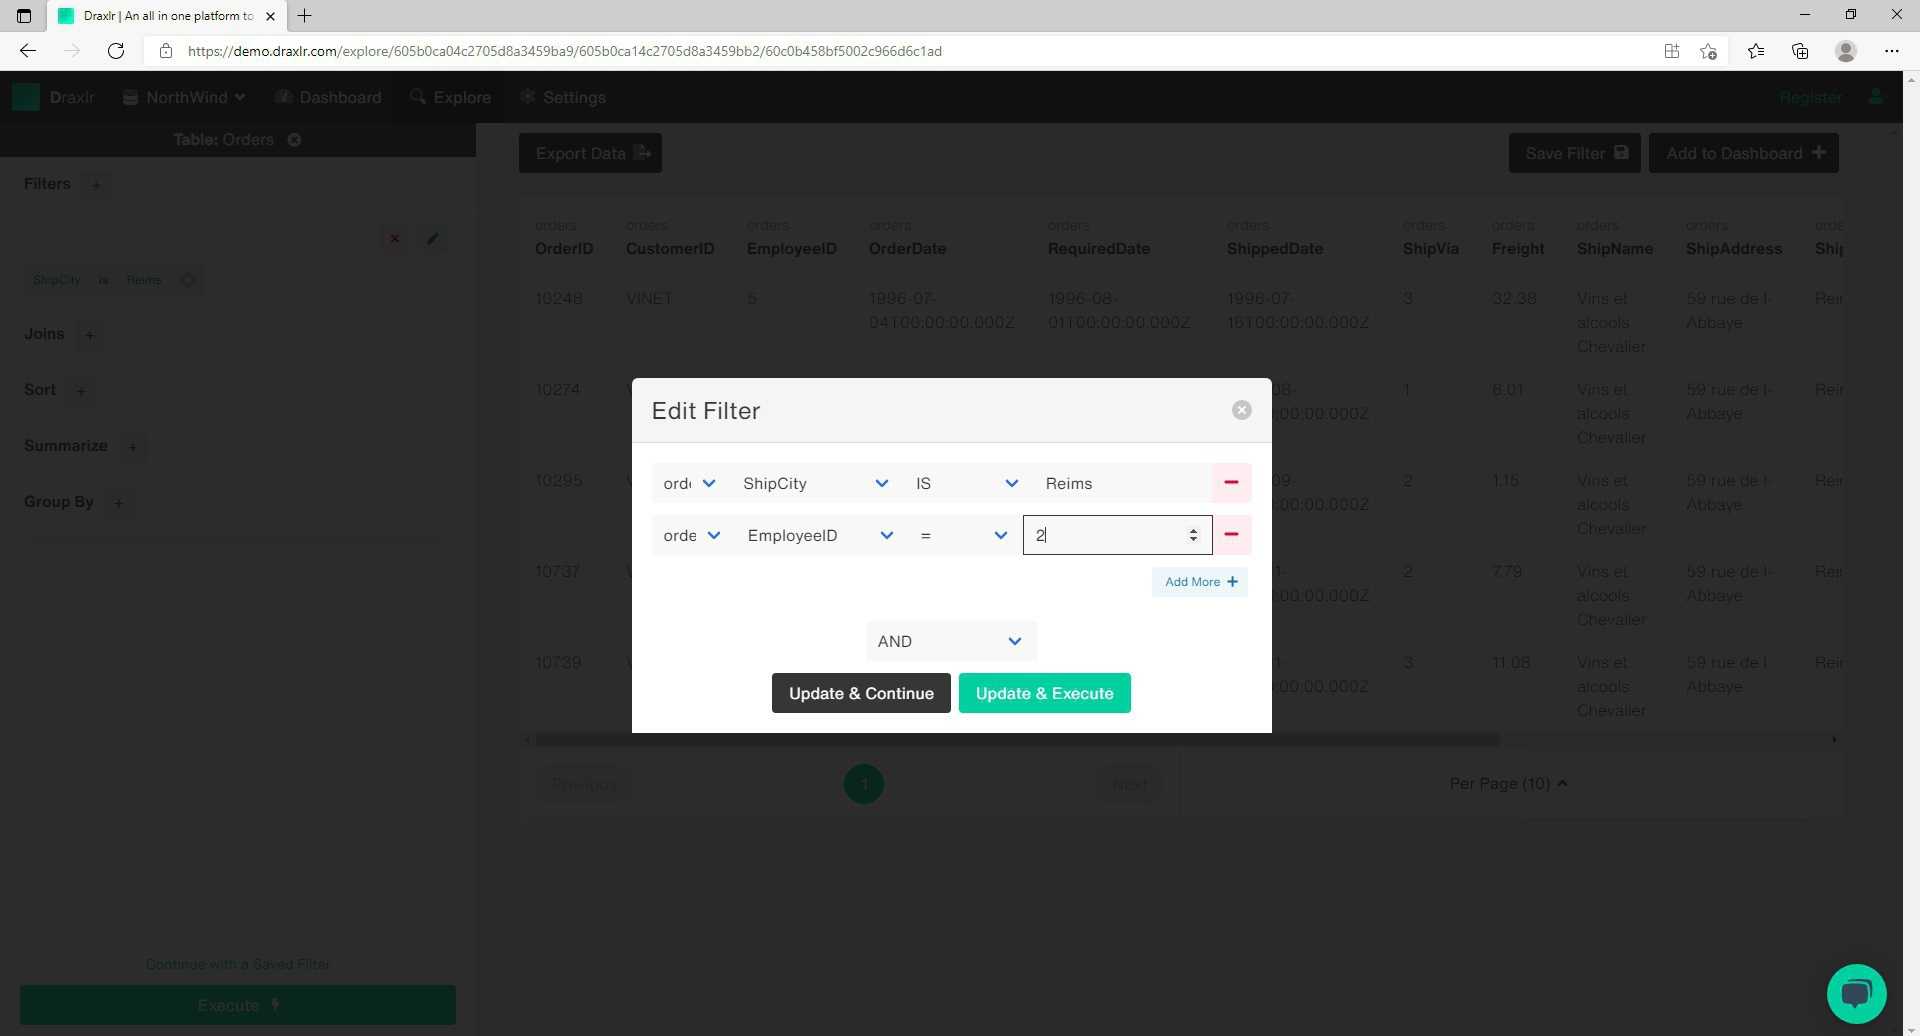
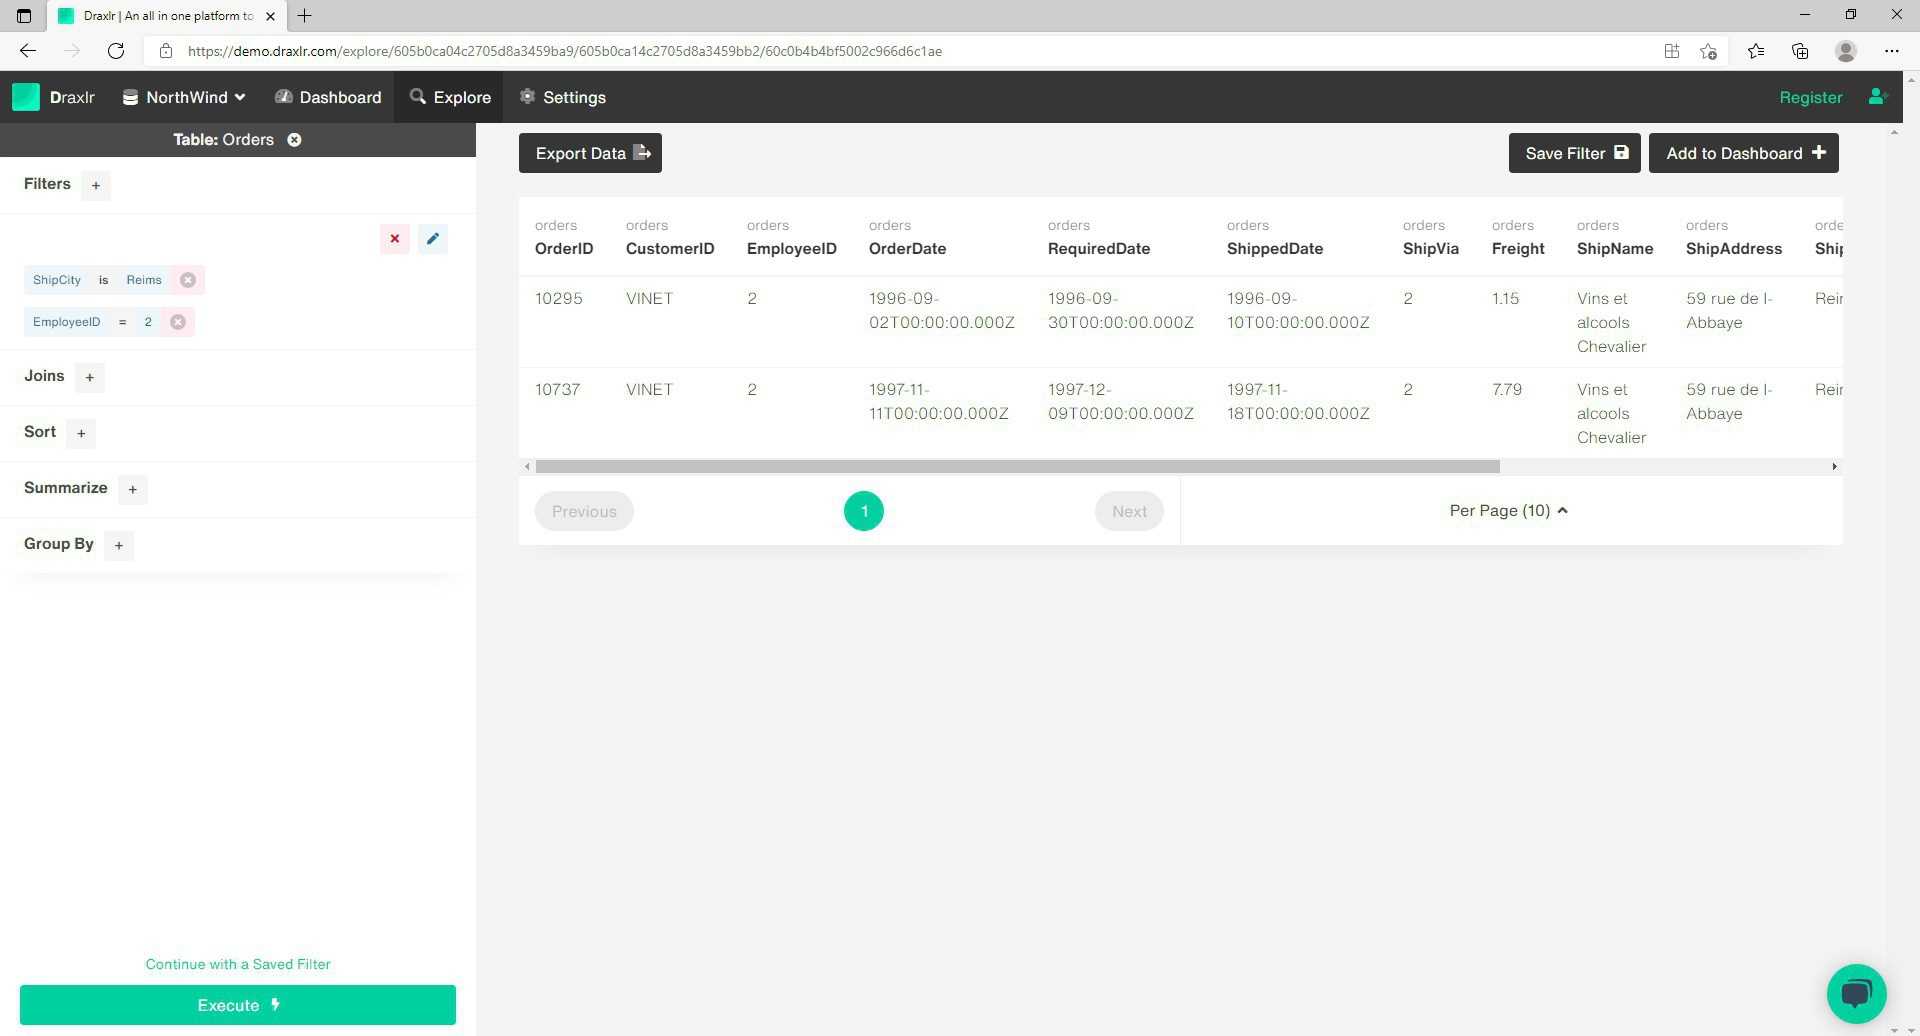
- Now say you need to find out all the orders shipped to the city Reims. For this select the "Filter" tool. It will open up a query builder box, prompting you to add filters. Set the "Field" to Operation to "IS" and then set Value to "Reims." Then click on Add and execute.
- Now say you want to further filter your search. From the orders shipped to Reims, you want to sort out the orders processed by Employee ID 2.
- For this click on the edit button, under the Filter tool, in the left panel. The previous query builder box will appear, displaying the existing Filter.
- This time click on "Add more." Set the "Field" to "EmployeeID" and "operations" to "="
- Set Value to "2," and Set "Filter Operation" to "AND." And click "Add and execute."
- Now let's understand the function of "Join"
B. Joins
- Now say in the order table itself we want to include the customer details ( which are available in a separate "customers" table.
- From the left panel, select "Joins," the join query builder box will appear. Check the box, "orders.CustomerID = customers.CustomerID"
- Checking this box establishes the query that you want to relate the "CustomerID" attribute from the "orders" table, with the "CustomerID" attribute from the "customers" table.
- Select the Join type to "Left Outer Join," which will command that you want all the data to be displayed from the "orders" table, irrespective of the availability of relational data in the "customers" table.
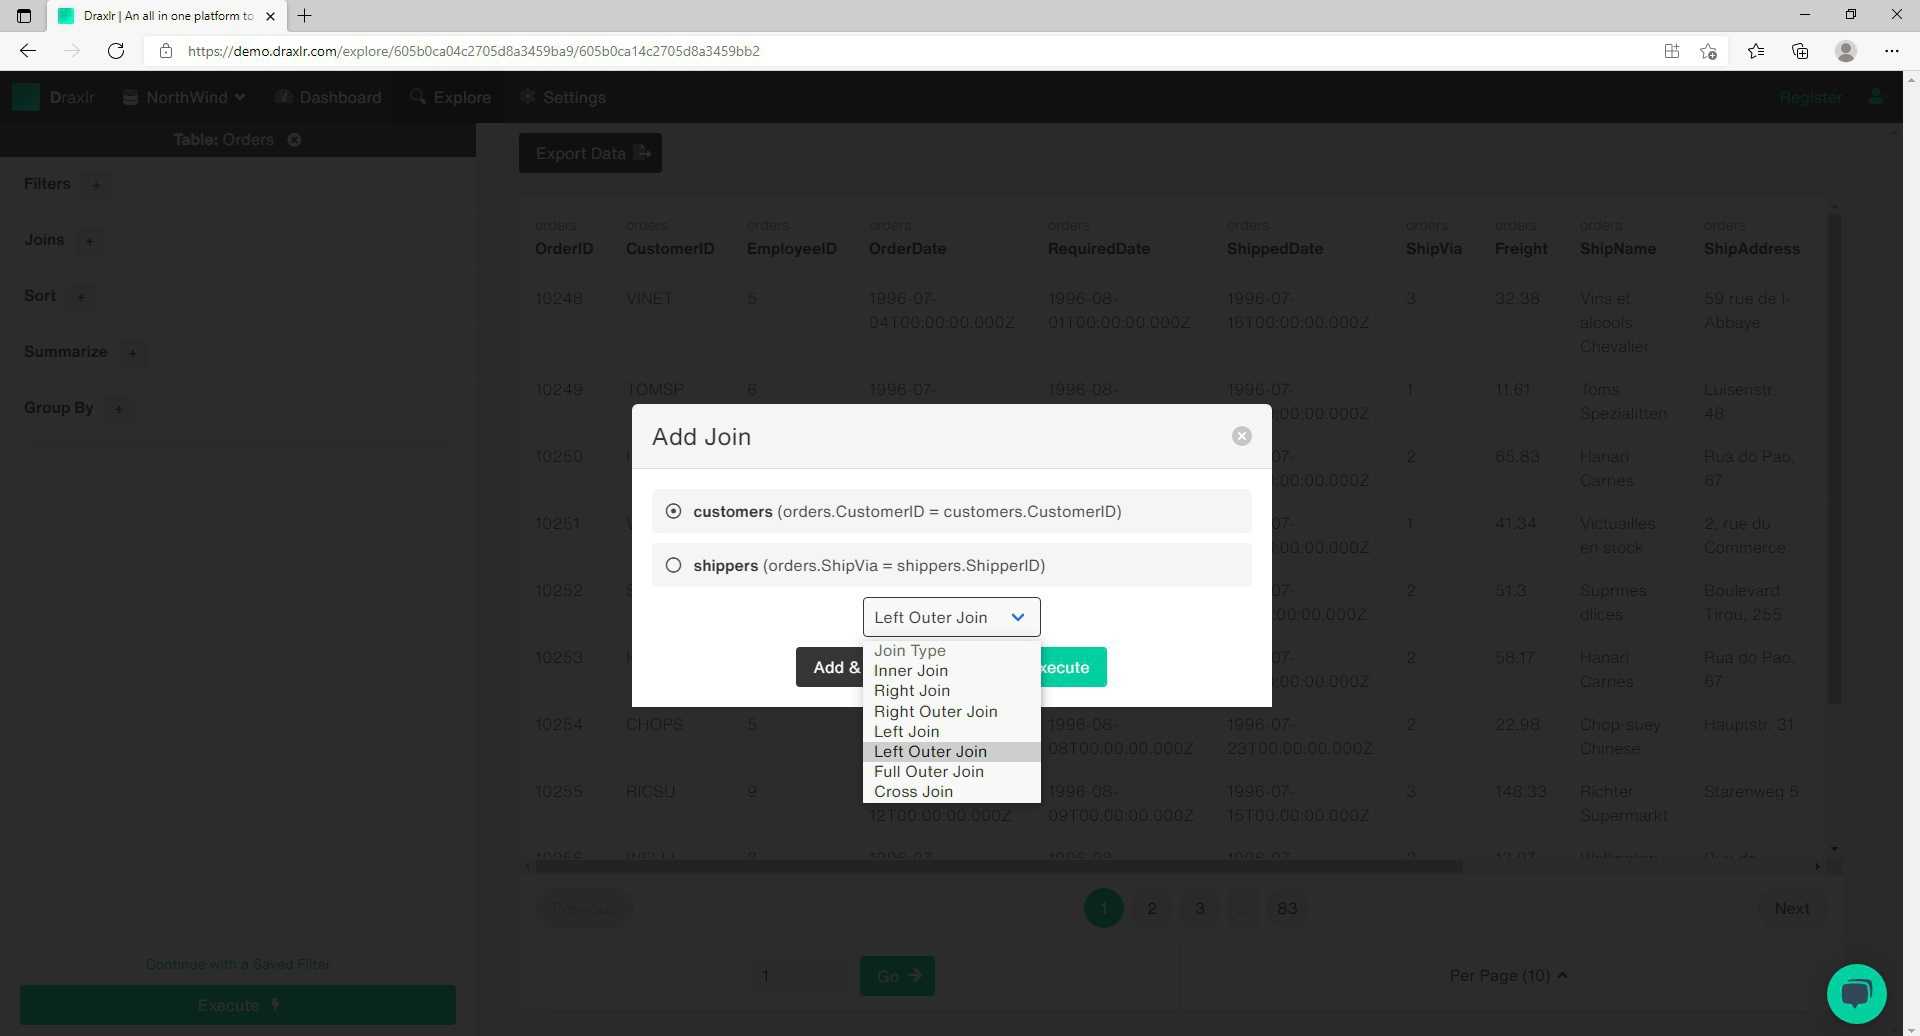
- And click "Add and execute"
- The new table will display all order details with their corresponding customer details. Note that the type of join you select is critical. The left outer join was relevant in the case of this example, you will need to change it according to your requirement.
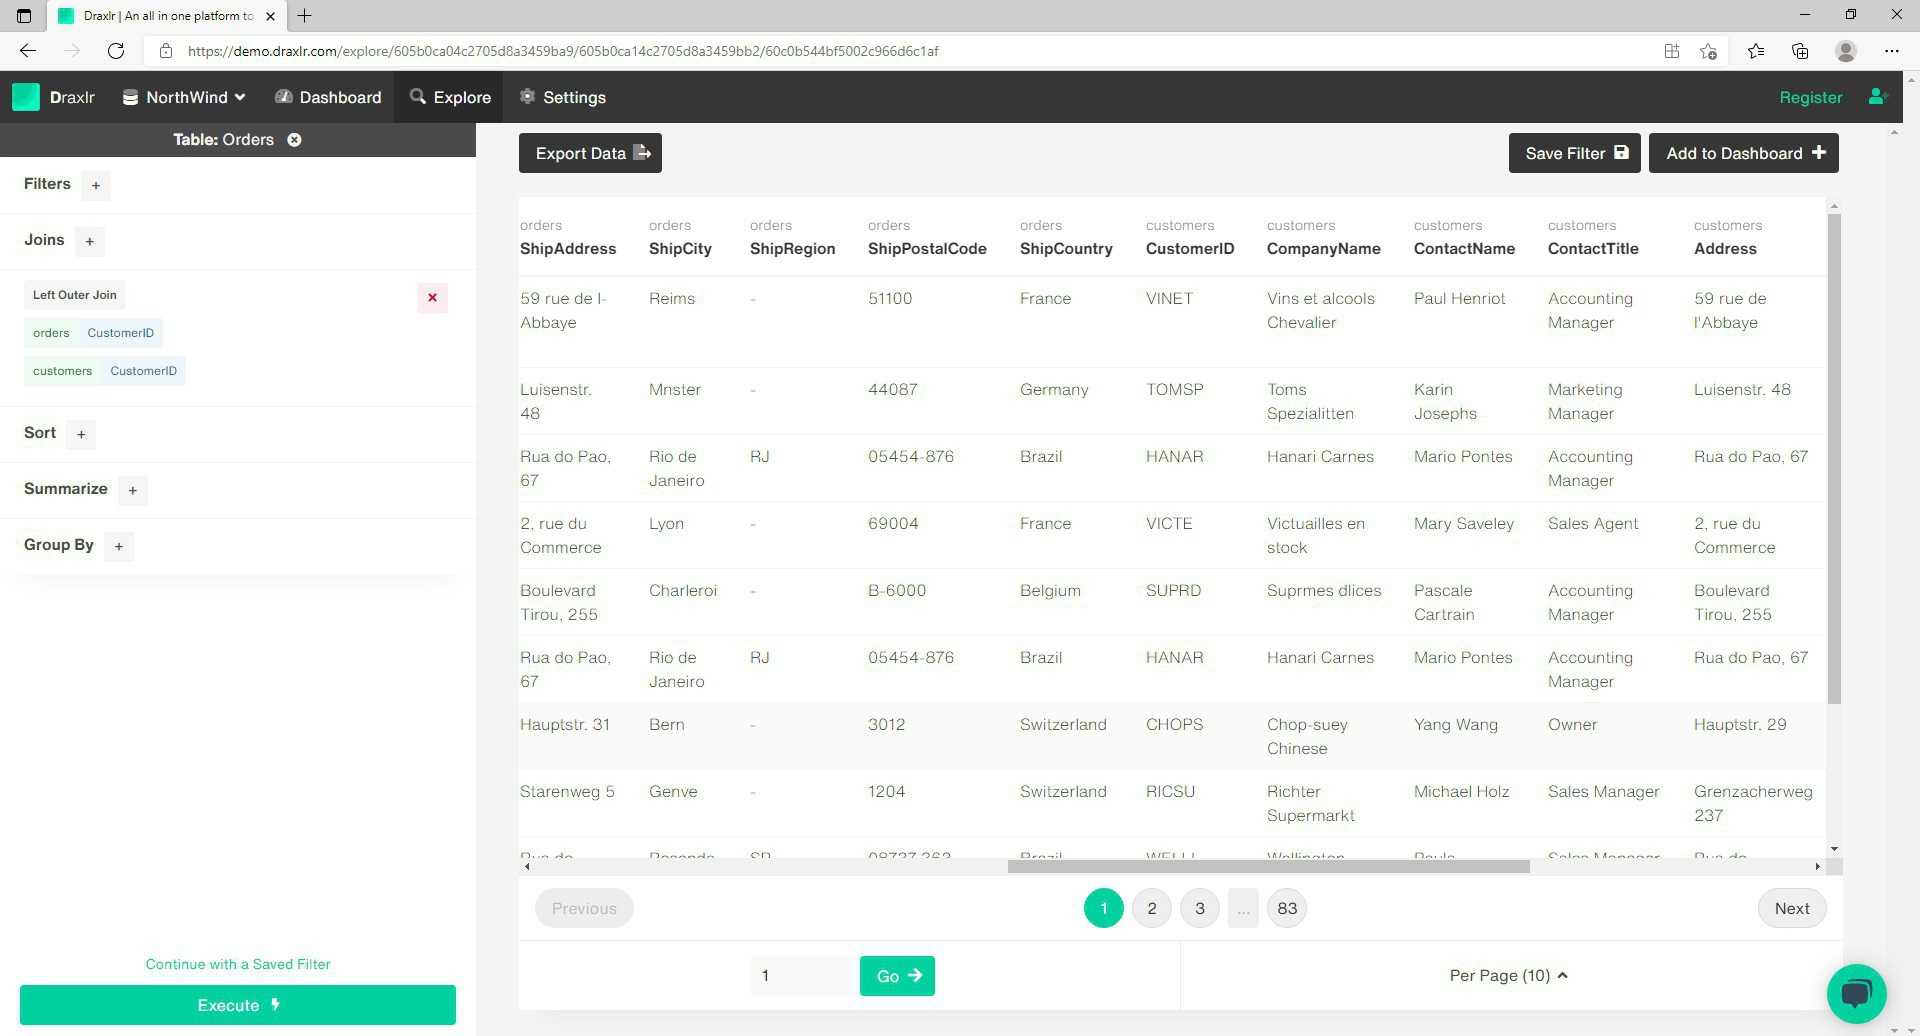
- Inner Join, will display only the order details (along with customer details) against which relevant customer details are available in the "customers" table. A right outer join will prioritize the data in your "customers" table. And Full outer join will include all data from both the tables.
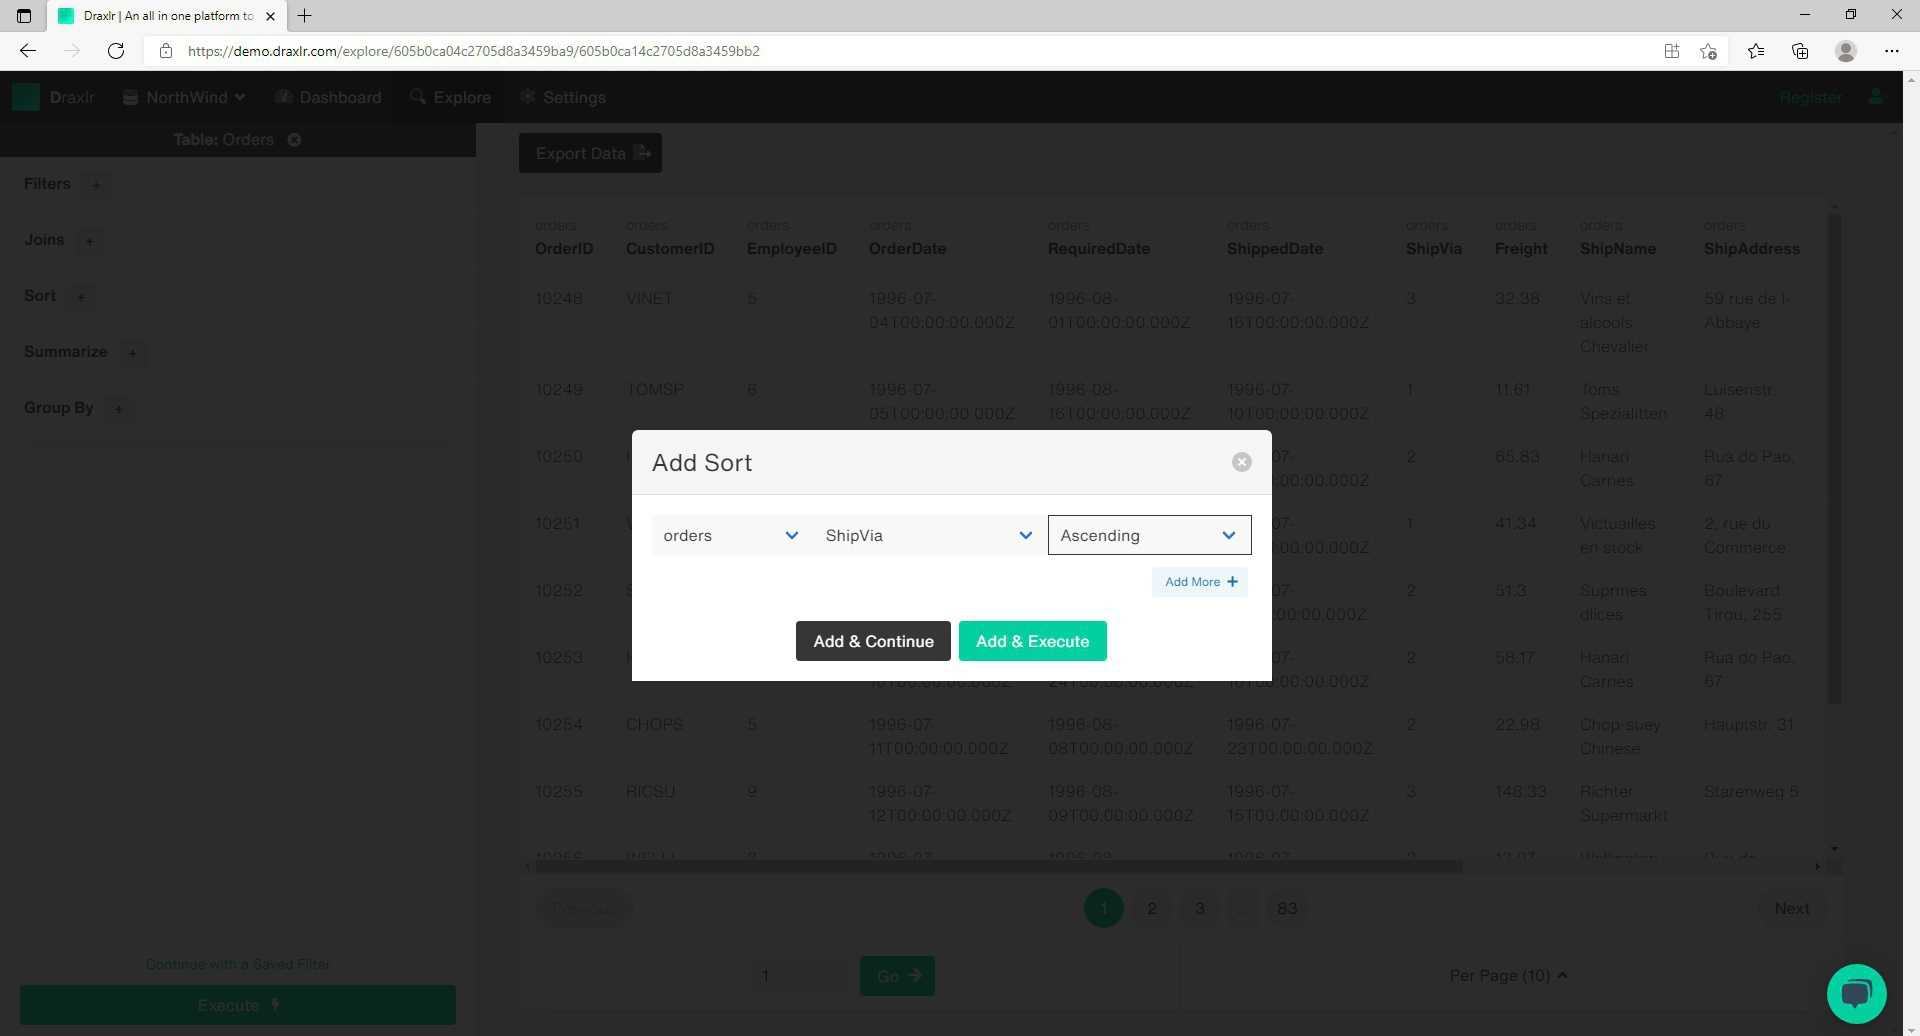
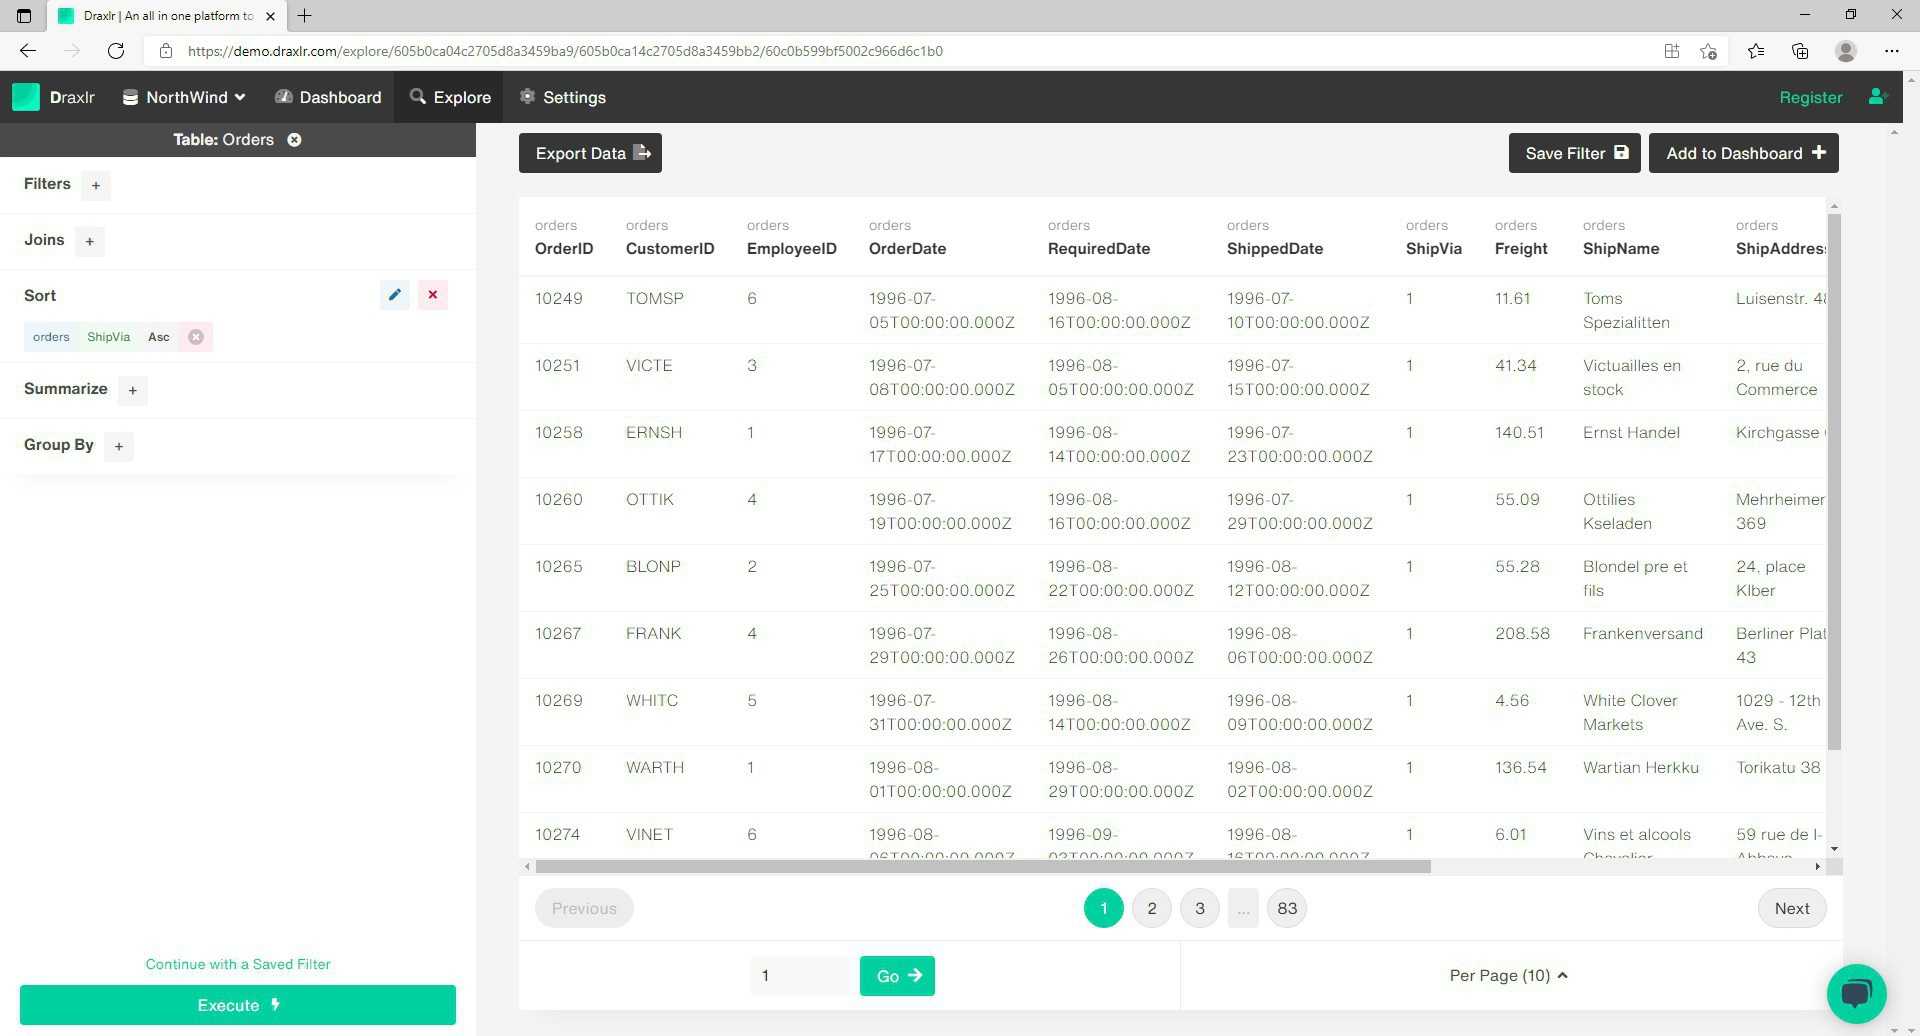
C. Sort
- To evaluate the Sort tool, let's take a situation where you need to view the order details, in a particular order based on their channel of shipment. First, you want the orders shipped Via "1," followed by the orders shipped Via "2," and then "3."
- Select the "Sort" option in the left panel. The "Add Sort" query builder box appears.
- Set Fields to "ShipVia," and order to "Ascending."
- And click "Add and execute"
- The "orders" table will be sorted based on the "ShipVia" attribute.
D. Summarize
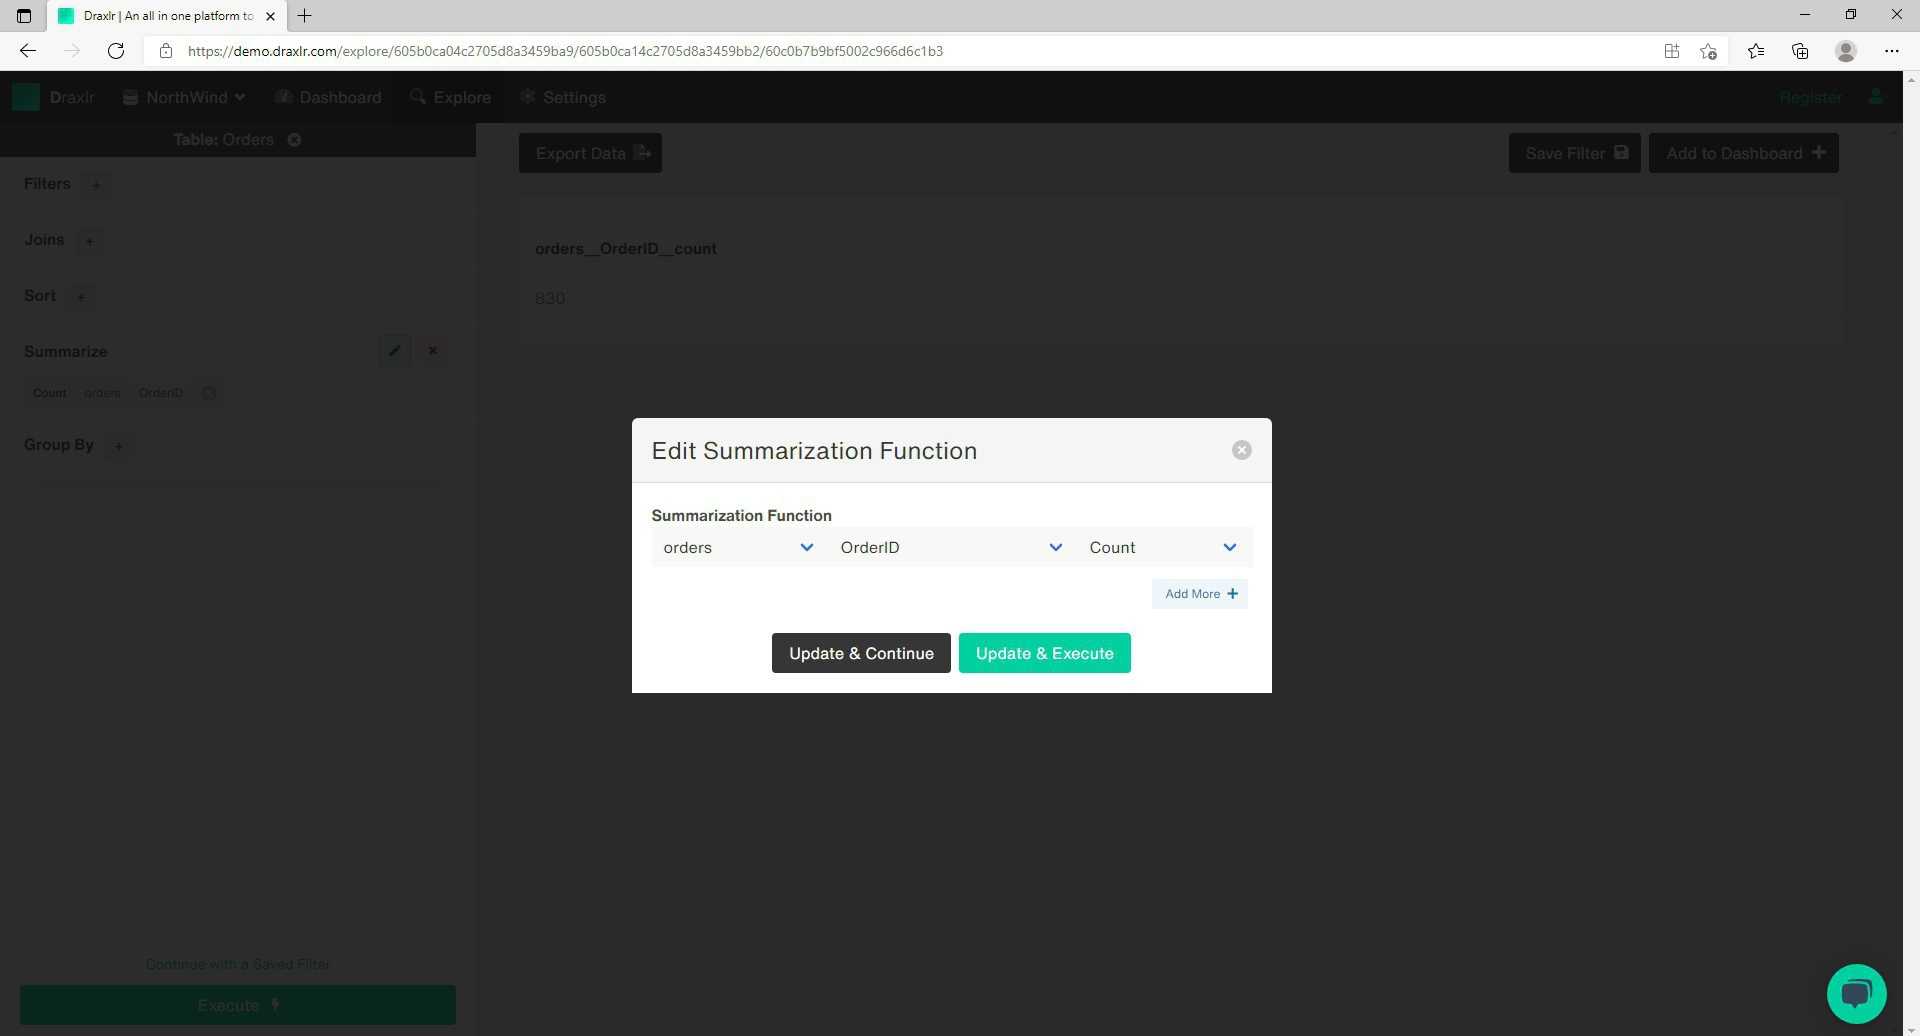
- If you check the "orders" table, you can see that multiple Order IDs are missing the "ShipRegion" attribute. So if we want to find out the total number of Order IDs—that are missing the "ShipRegion" attribute—we can use the summarize option.
- Select the Summarize option from the left panel.
- The "Add Summarization Function" box will appear.
- Set the field to "OrderID" and set the order to "Count."
- Now click on "Add more," and set the field for the second summarization function to "ShipRegion," and order to "Count."
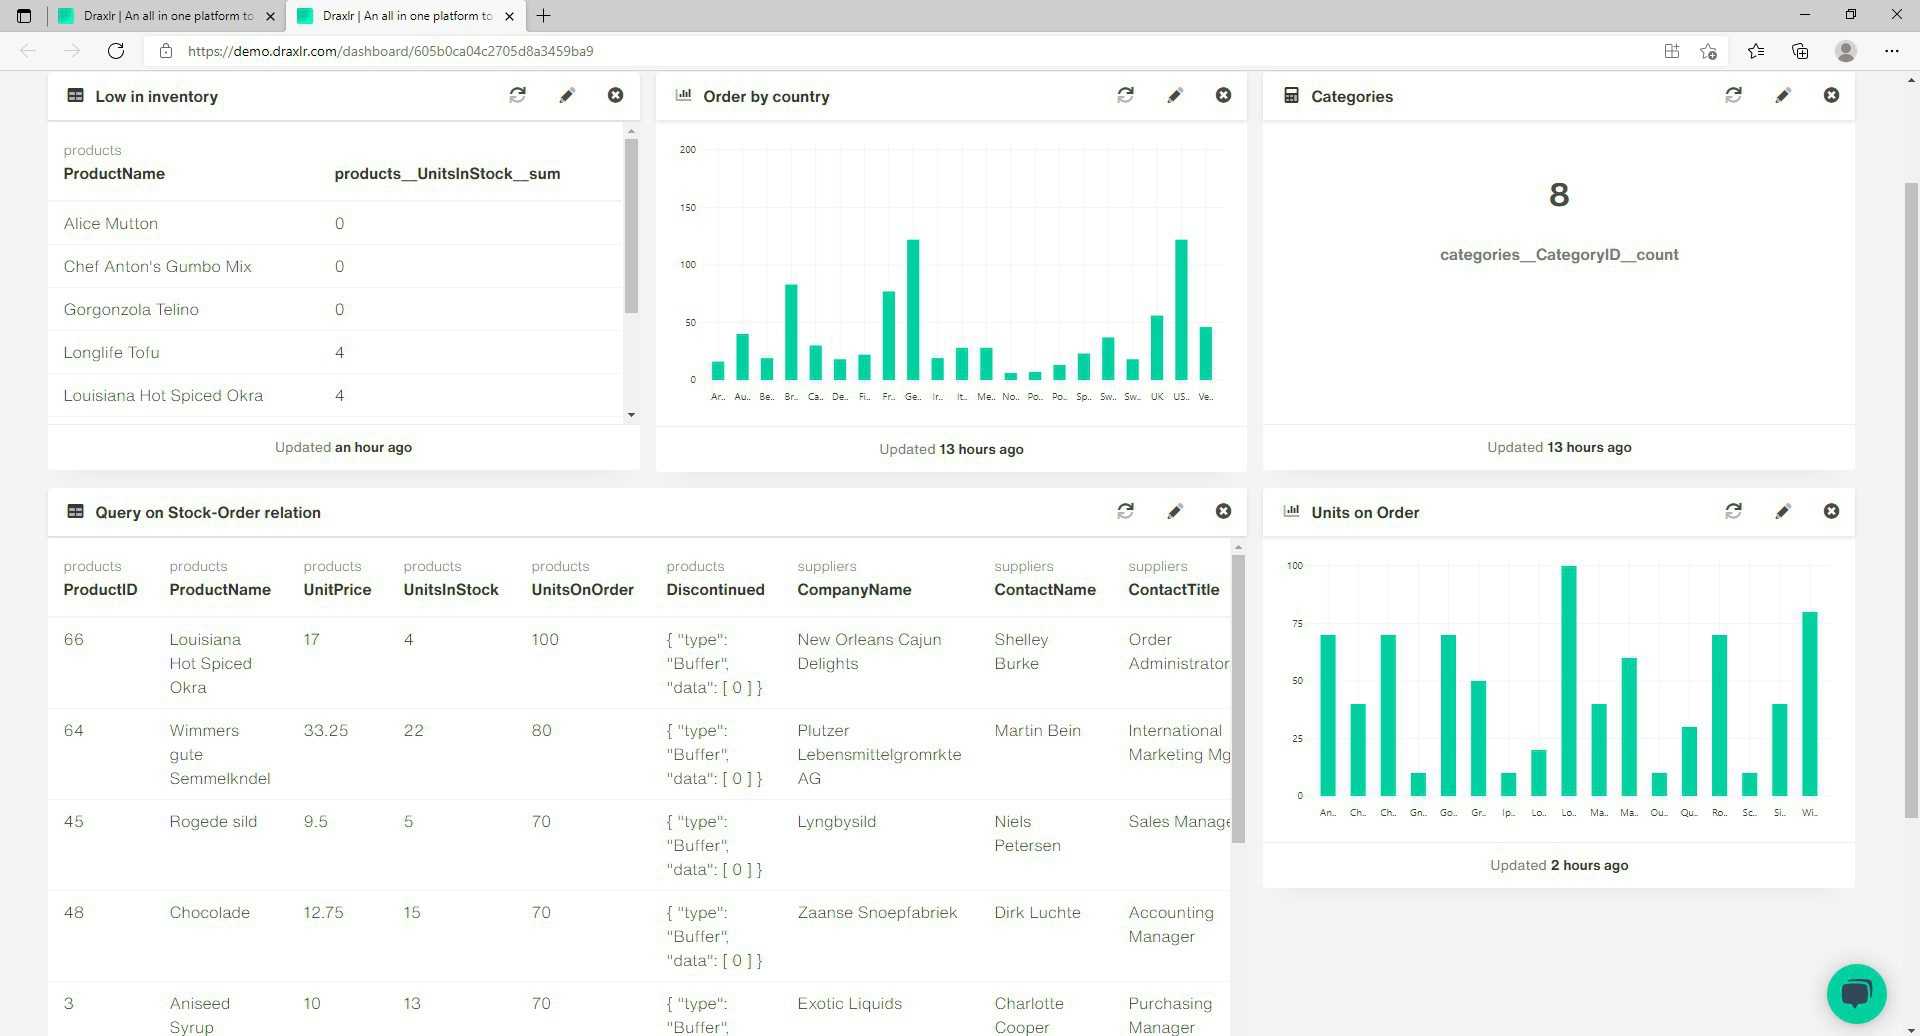
- Click Add and execute. The result is displayed with the Order ID count summarized to 830, and the Ship Region count summarized to 323.
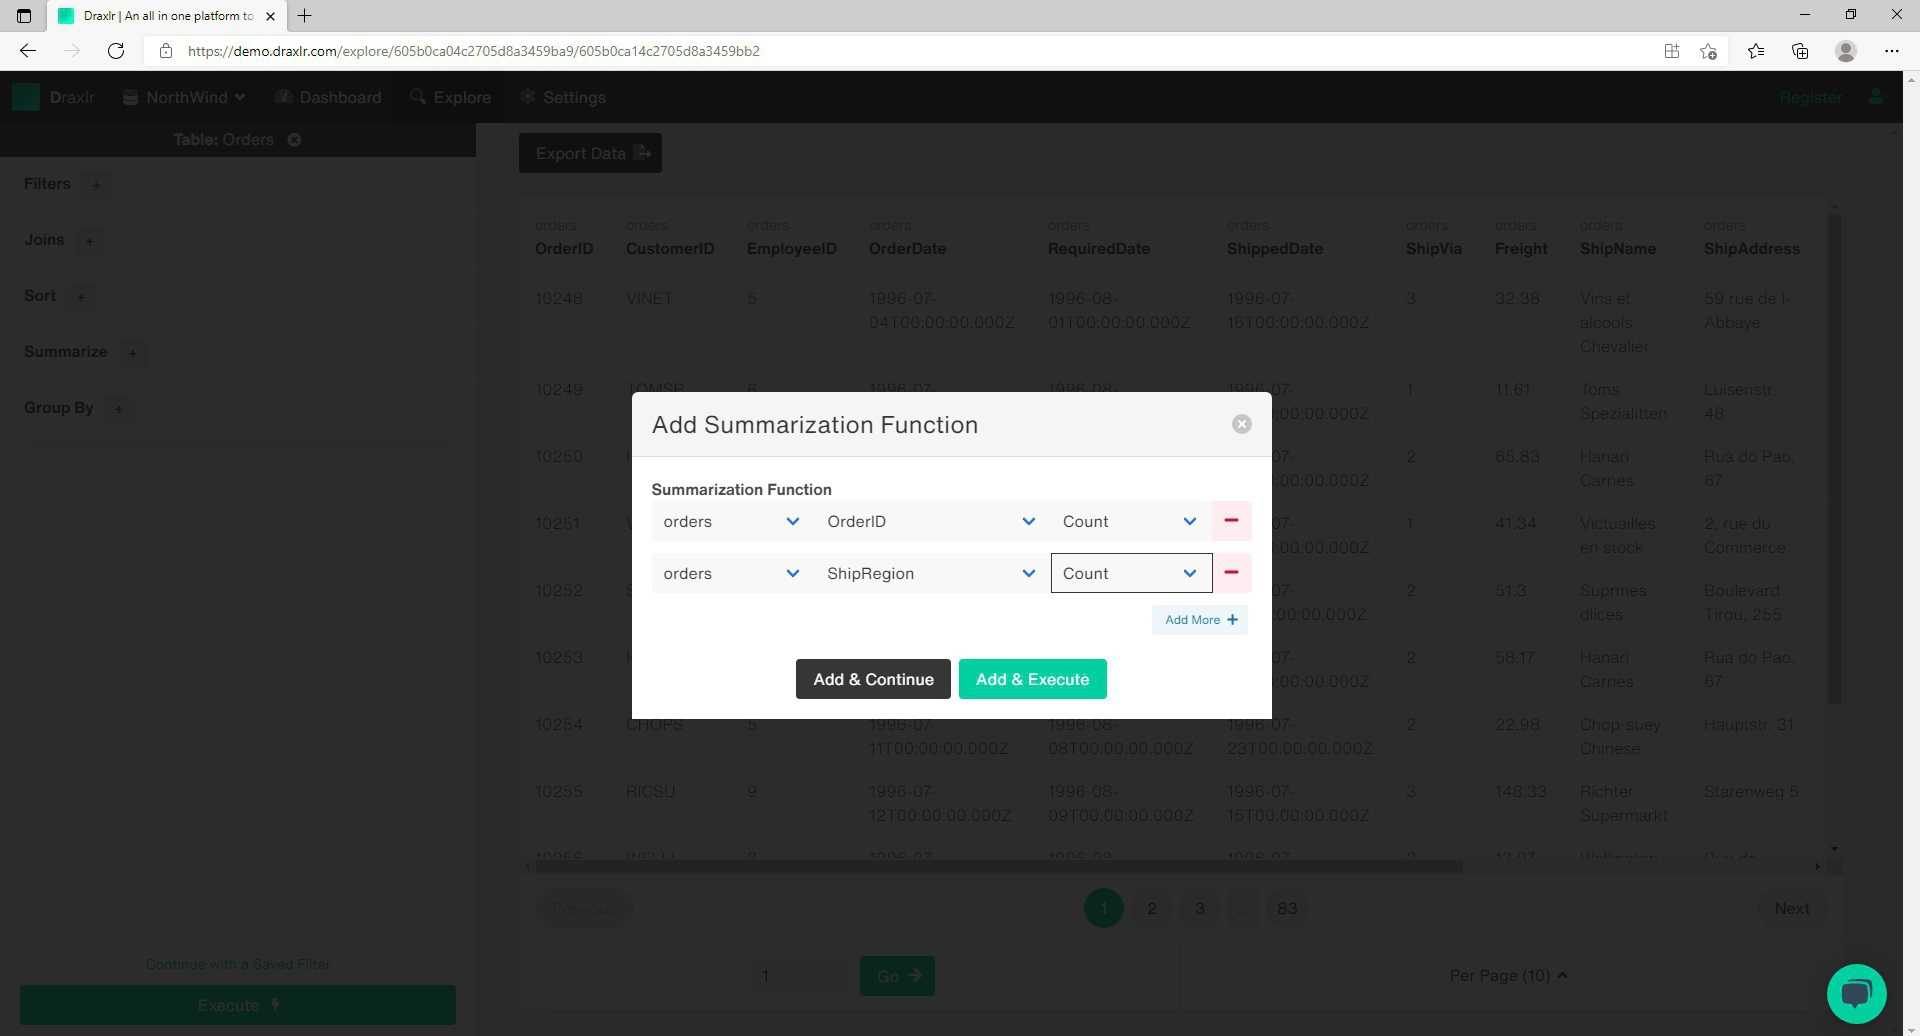

- A total of 507 Order IDs are missing the "ShipRegion."
- Apart from Using the Summarize option to count the number of entries, depending on the data, you can also sum up all the values under a particular attribute, find the average, and even find the minimum and maximum value.
E. Group By
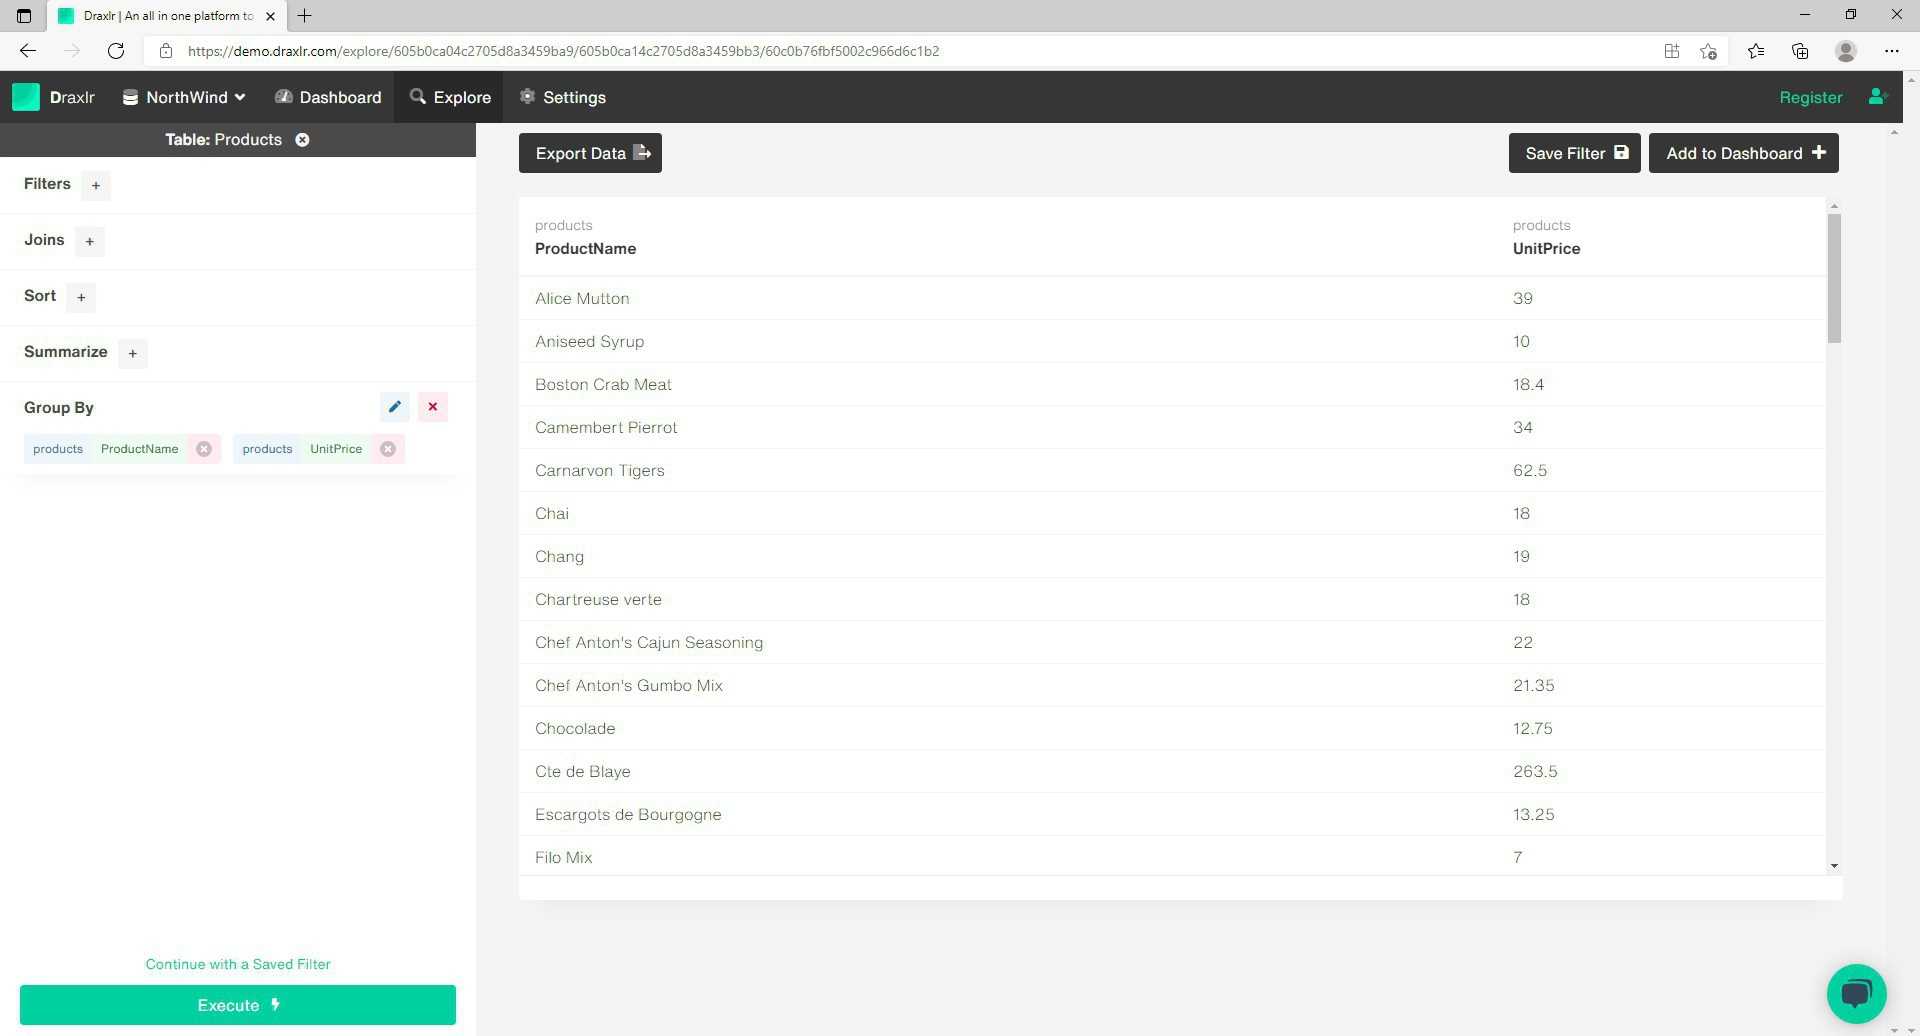
- Let's analyze the data from the "products" table, to understand the group by function.
- From this table, if we only want to view the products with their Unit price, the Group By feature will come in handy.
- Select the Group by option from the left panel.
- Select the "products" table and set the Field to "ProductName."
- Select "Add more" and set table to "products" and Field to "UnitPrice."
- This will Group the two attributes "ProductName" and "UnitPrice" into a single table of their own.

Step 2 — Implementing the tools for advanced query
The Summarize and Group By option can be used in combination, to yield business insights that can be converted to compelling visual representations.
- Select the orders table
- We can see that different orders are shipped to different countries. Let's assume we need to figure out the total number of orders per country.
- Open the "Add summarization function" from the left panel. Select the table "orders," set the field to "OrderID" and set order to "Count." Click Add and execute.
- Next, open the "Add Group By" box, and set the field to "ShipCountry," and execute.
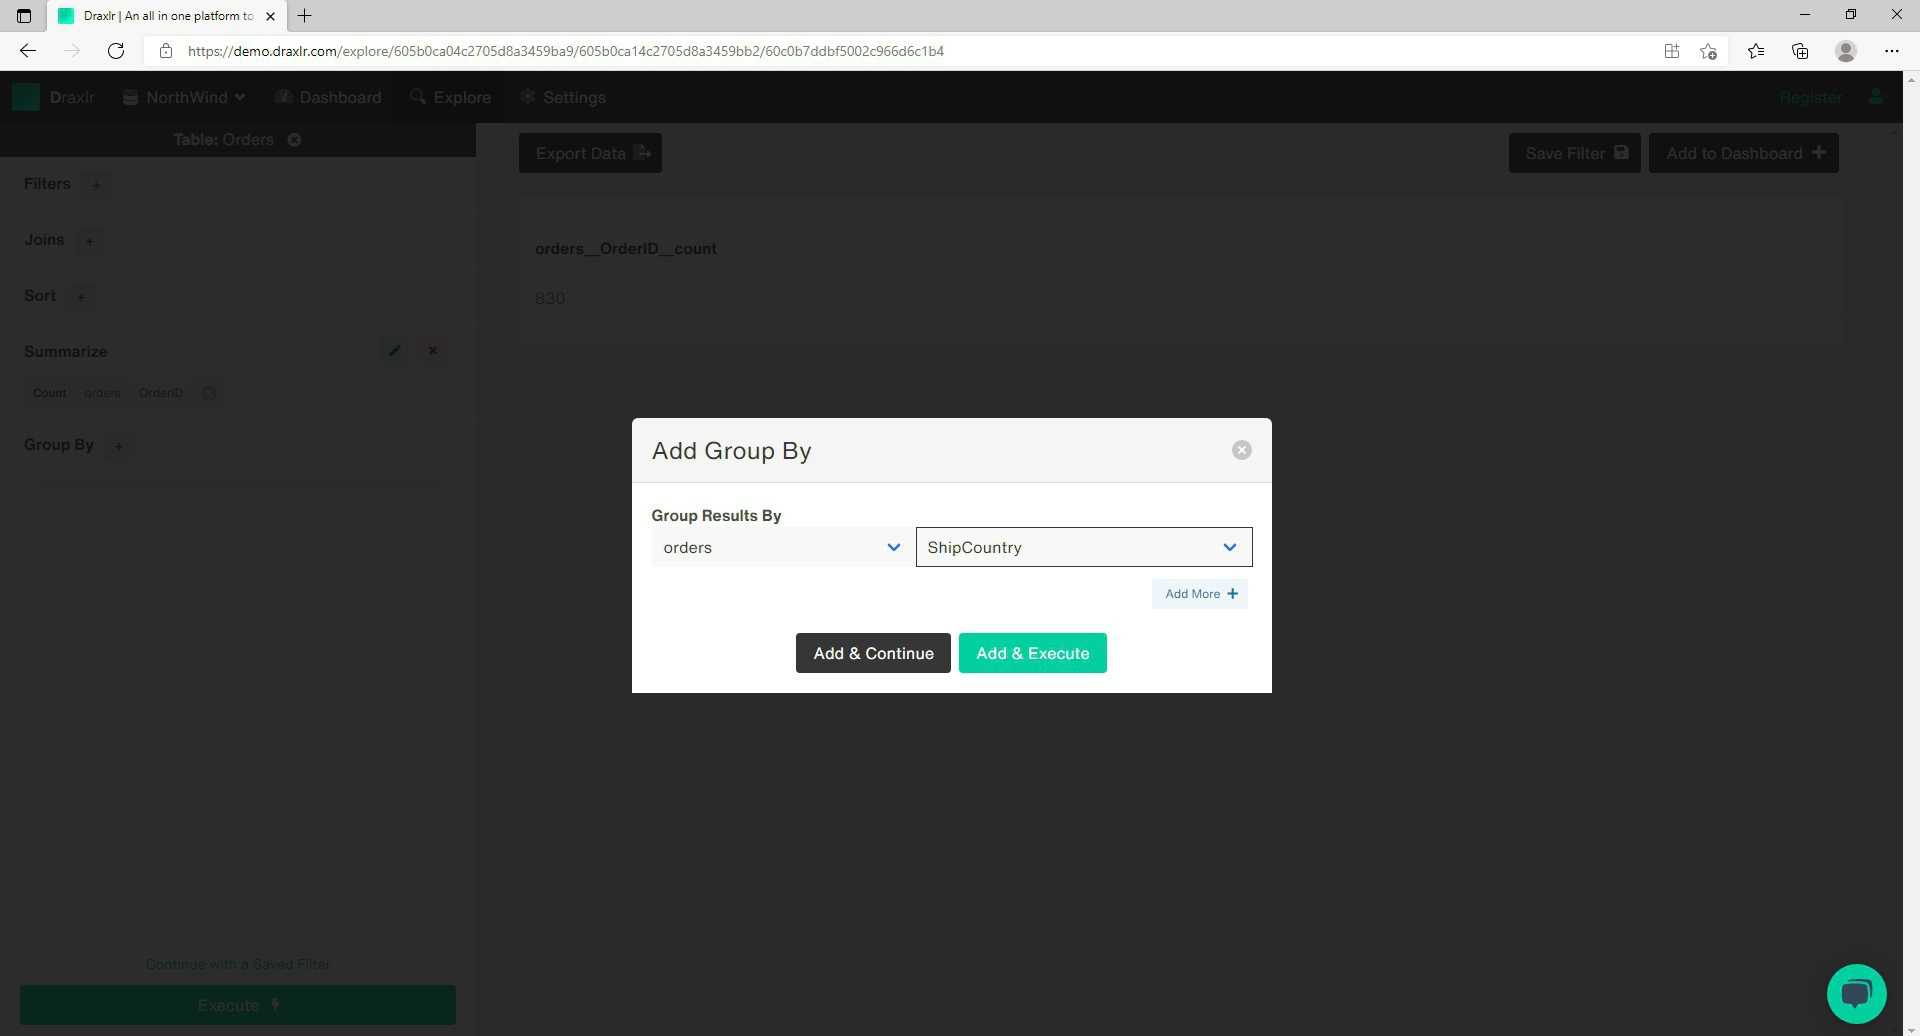
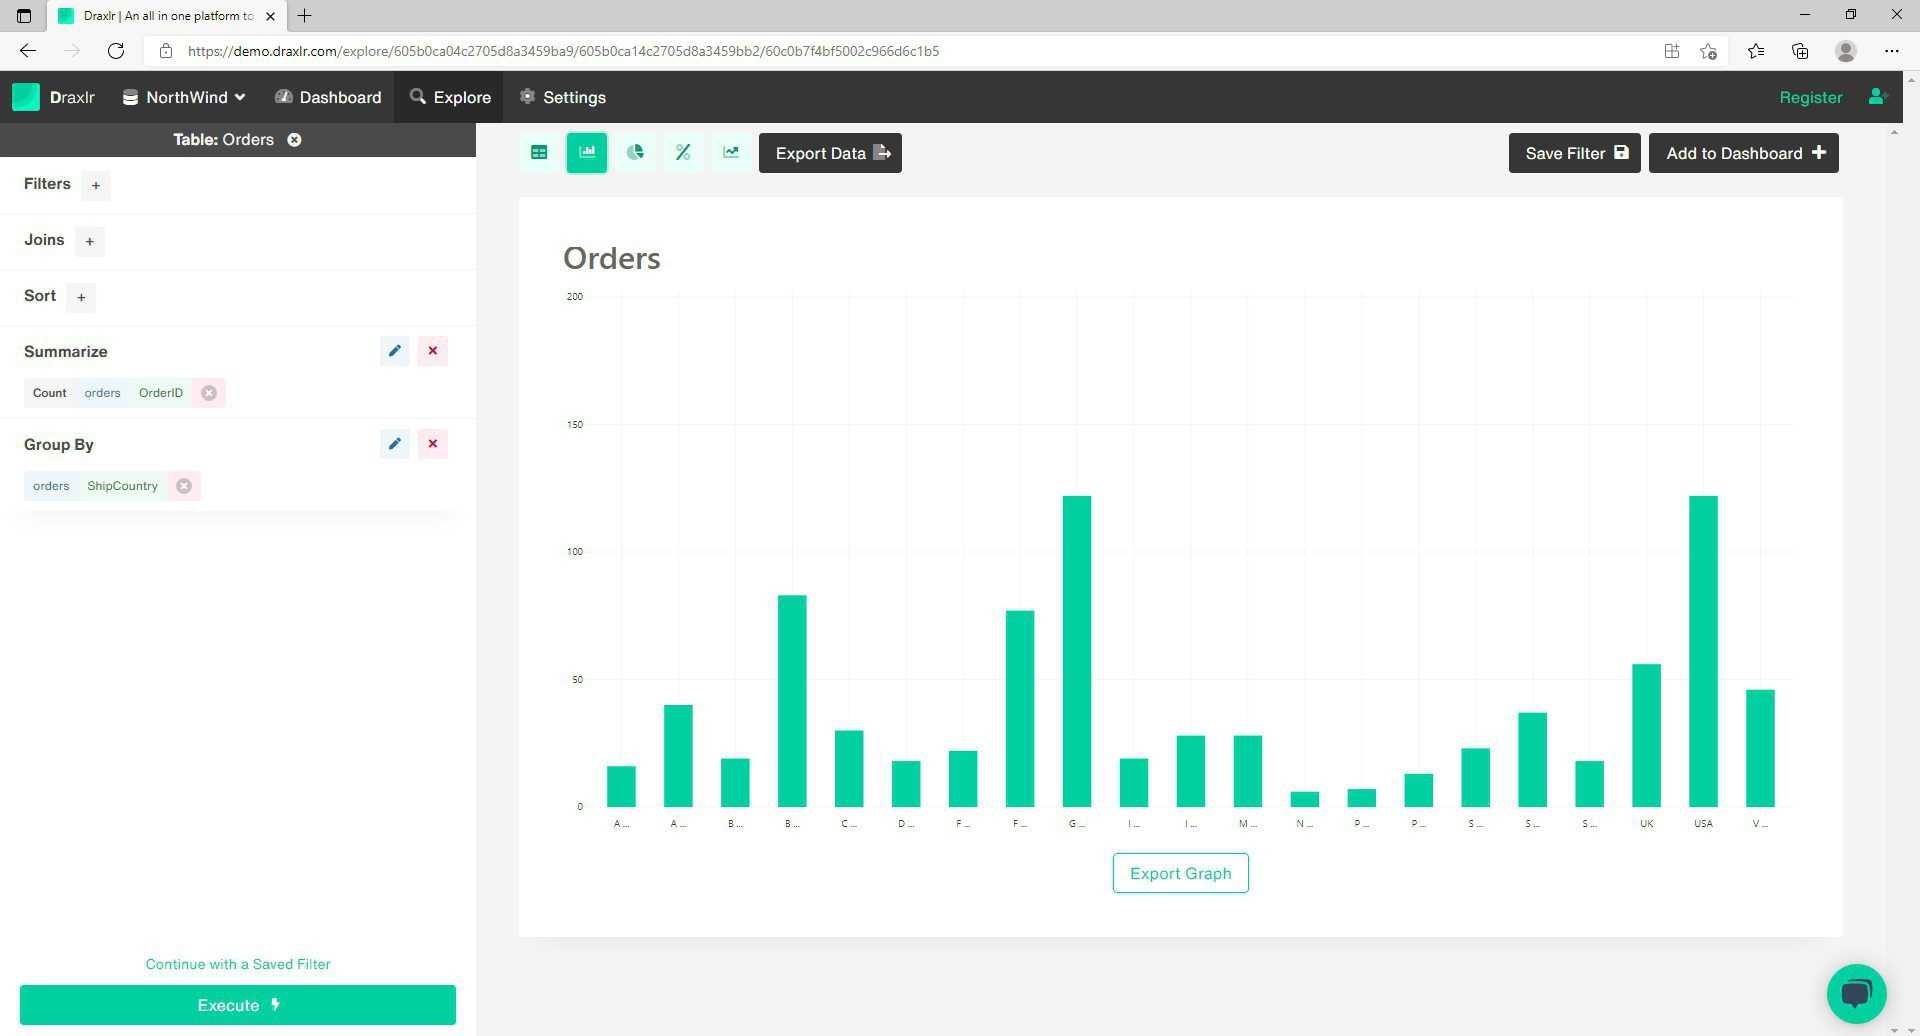
- This query will show you the total number of orders shipped to, per country.
- On the top of your result, you get the buttons to switch your view to one of the graphical representations—bar graph, pie chart, percentage distributor, and line graph.
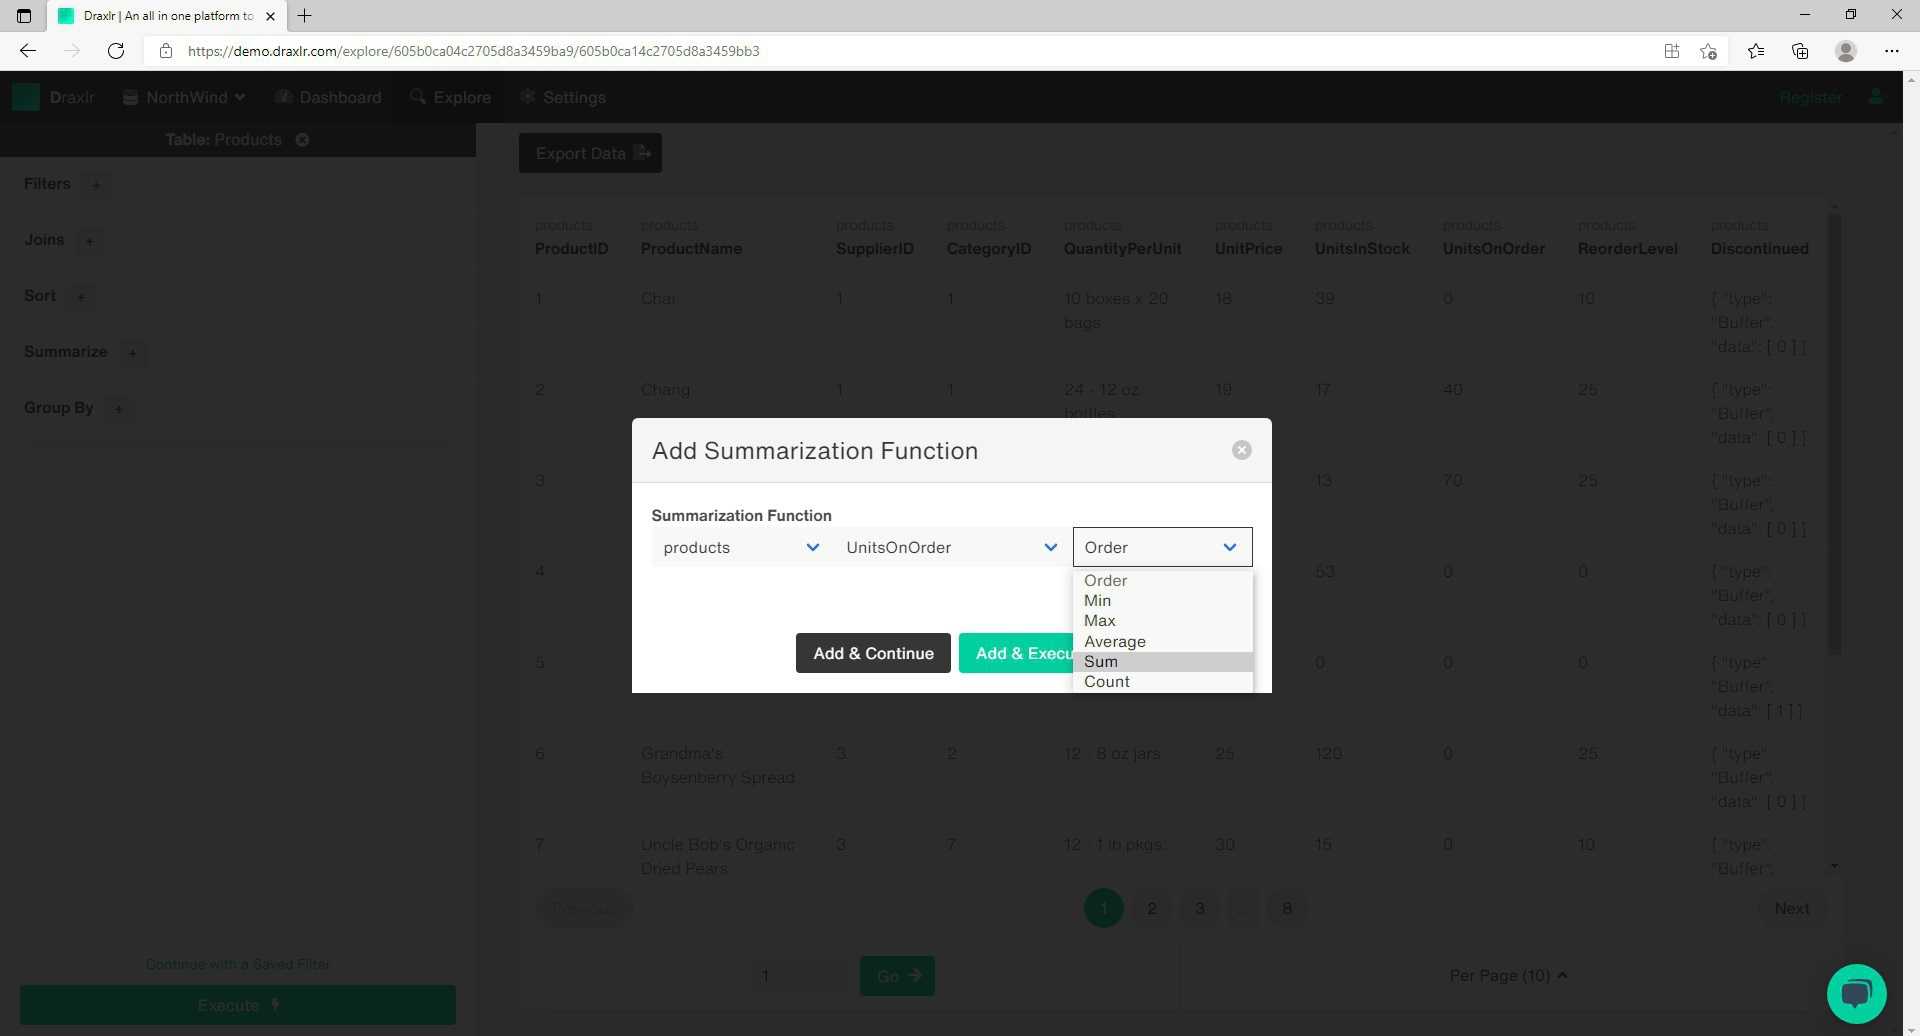
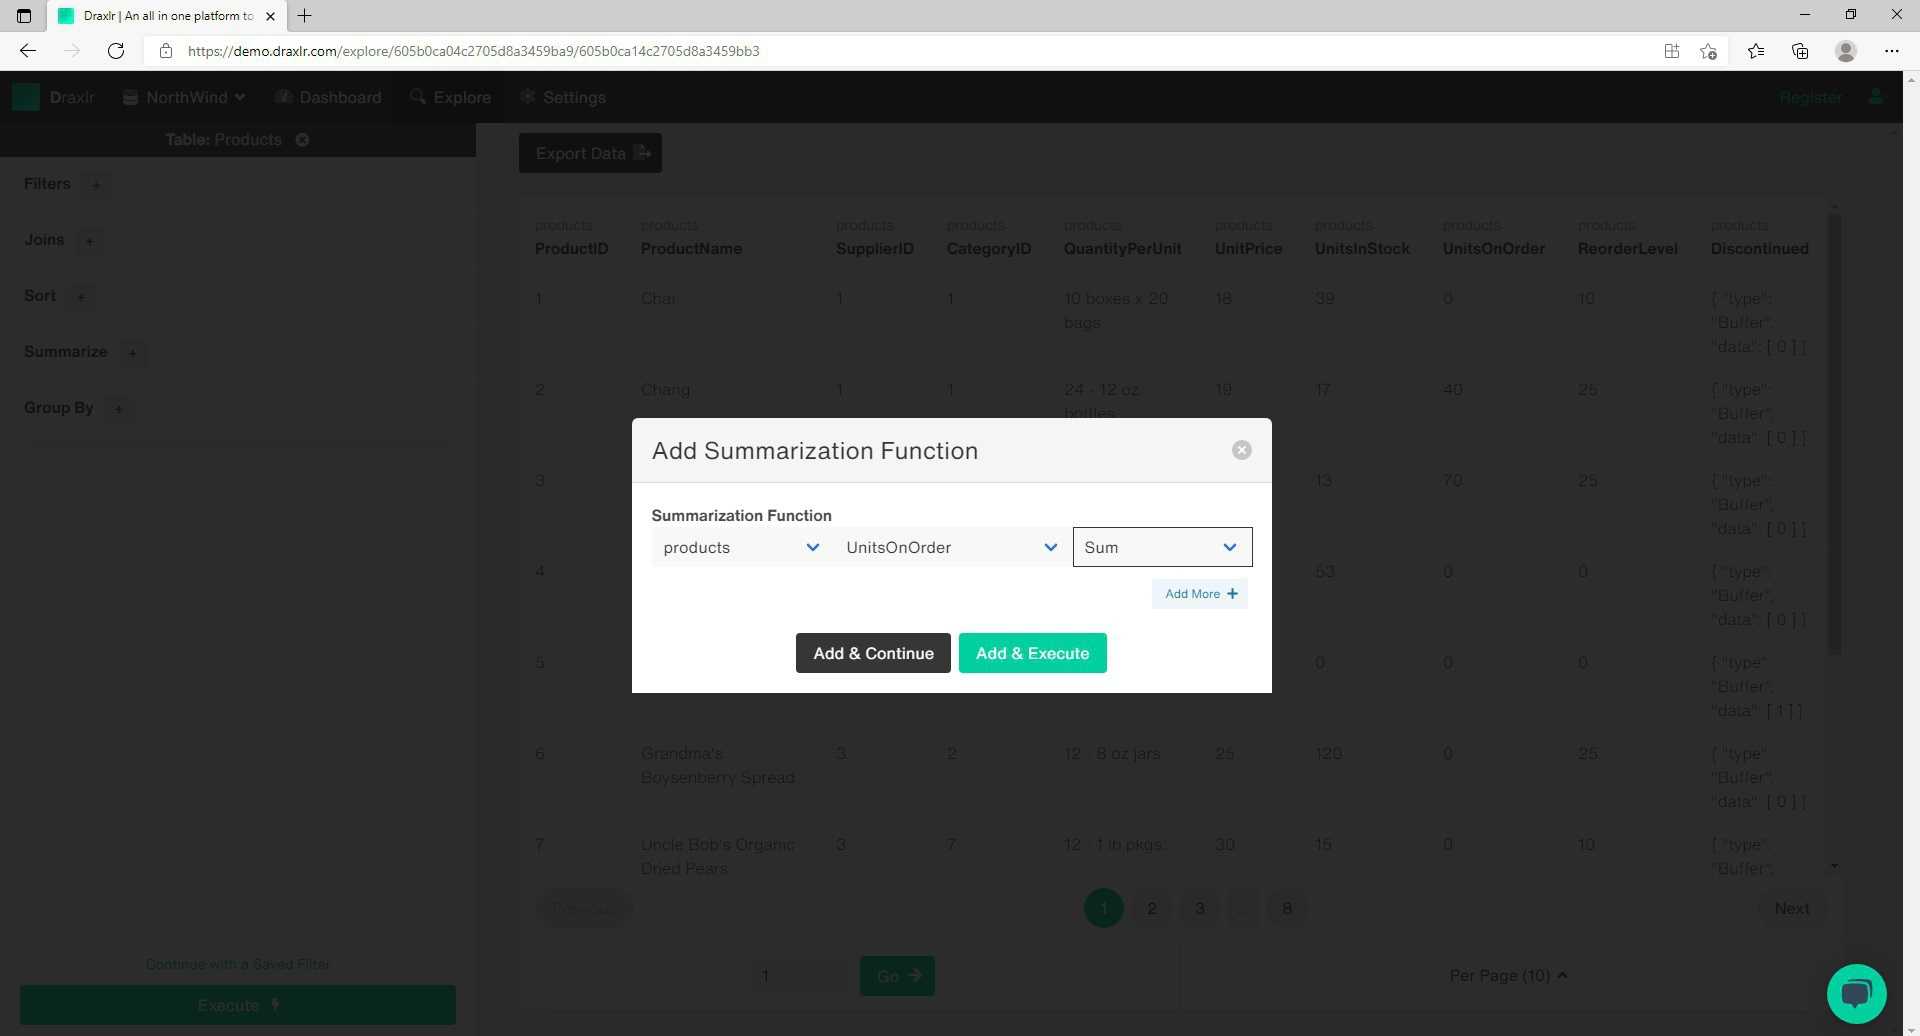
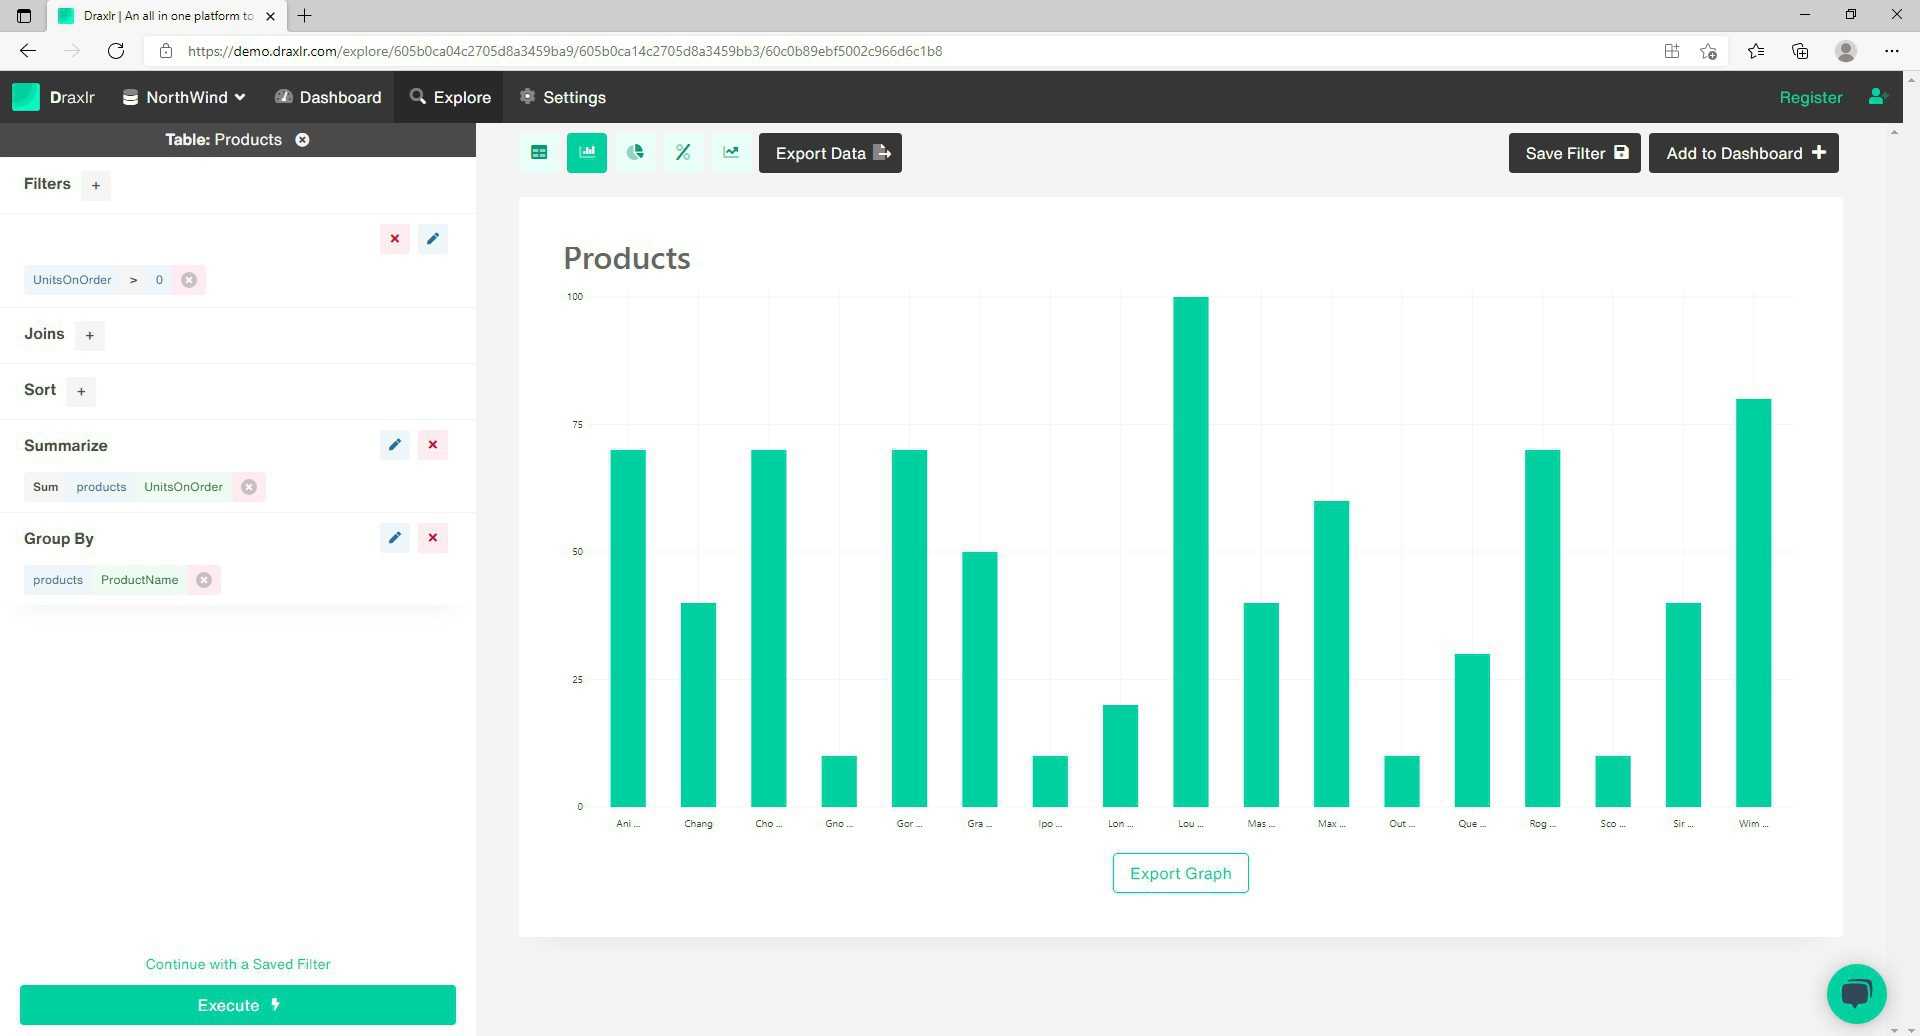
- In another instance let's analyze the "products" table and find out the total number of units on order, per product.
- Open the "products" table, and similar to the previous instance, open up the summarization function. Select the table "products" and set the field to "UnitsOnOrder." The order however needs to be set to "Sum," instead of count. Add and Execute
- Next, open up the Group By Option, set the table to "products" and field to "ProductName"
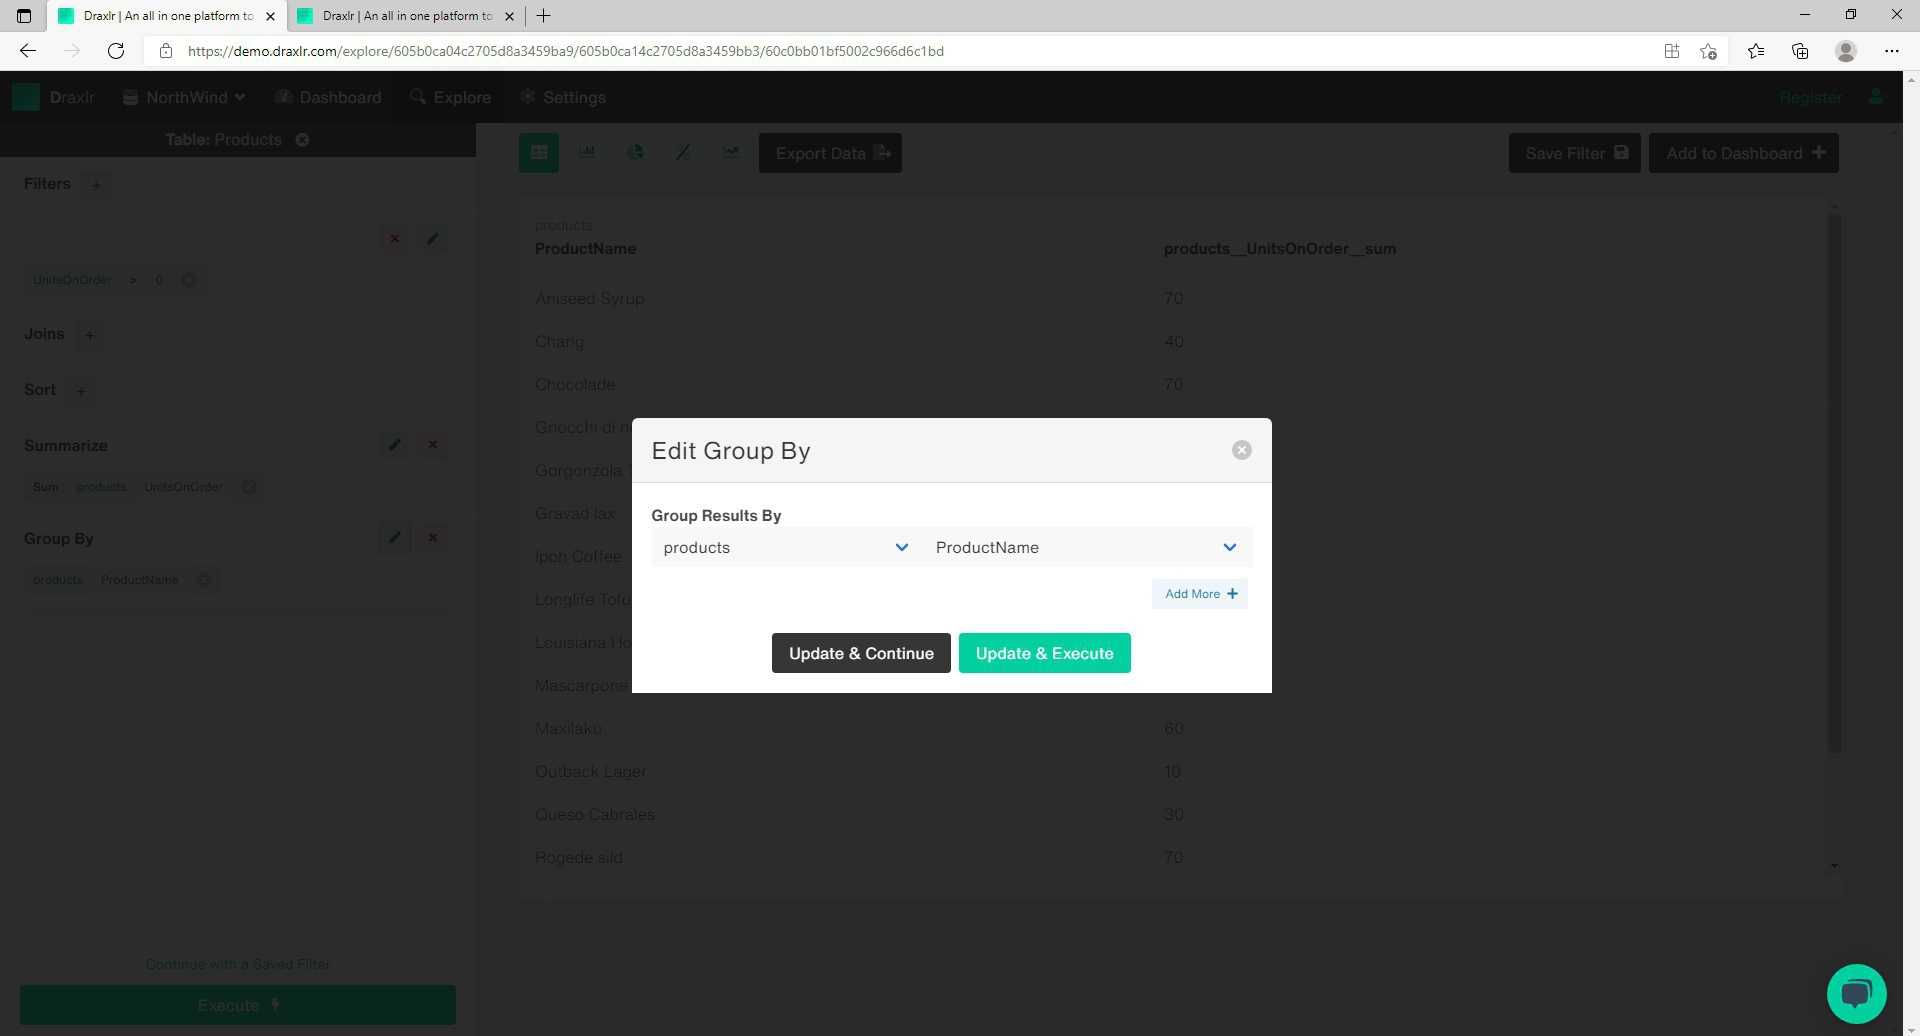
- You will have a table with only the product names and their respective number of Units on order.
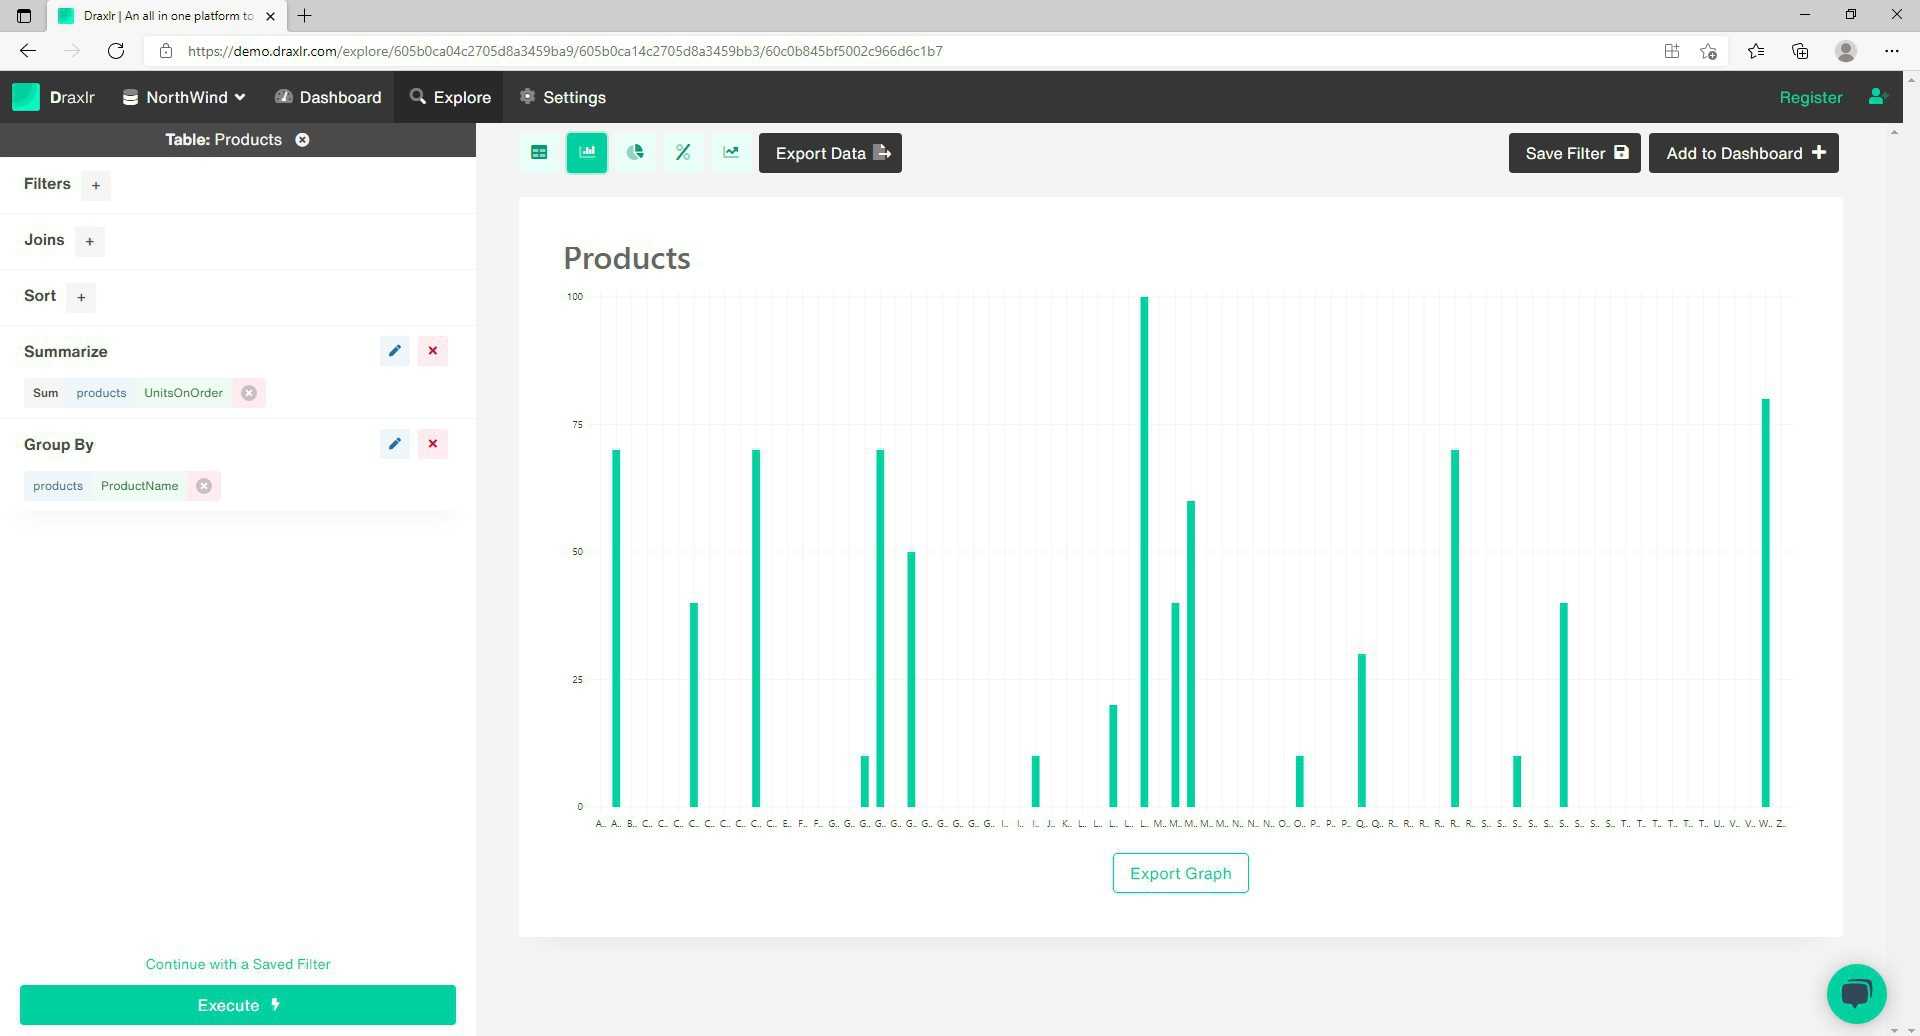
- On top of your results, you can switch the view to a graph view, for a better understanding.
- However, too much data can be visually disturbing on a graph. So say you want to eliminate all the entries for Products with zero Units on order.
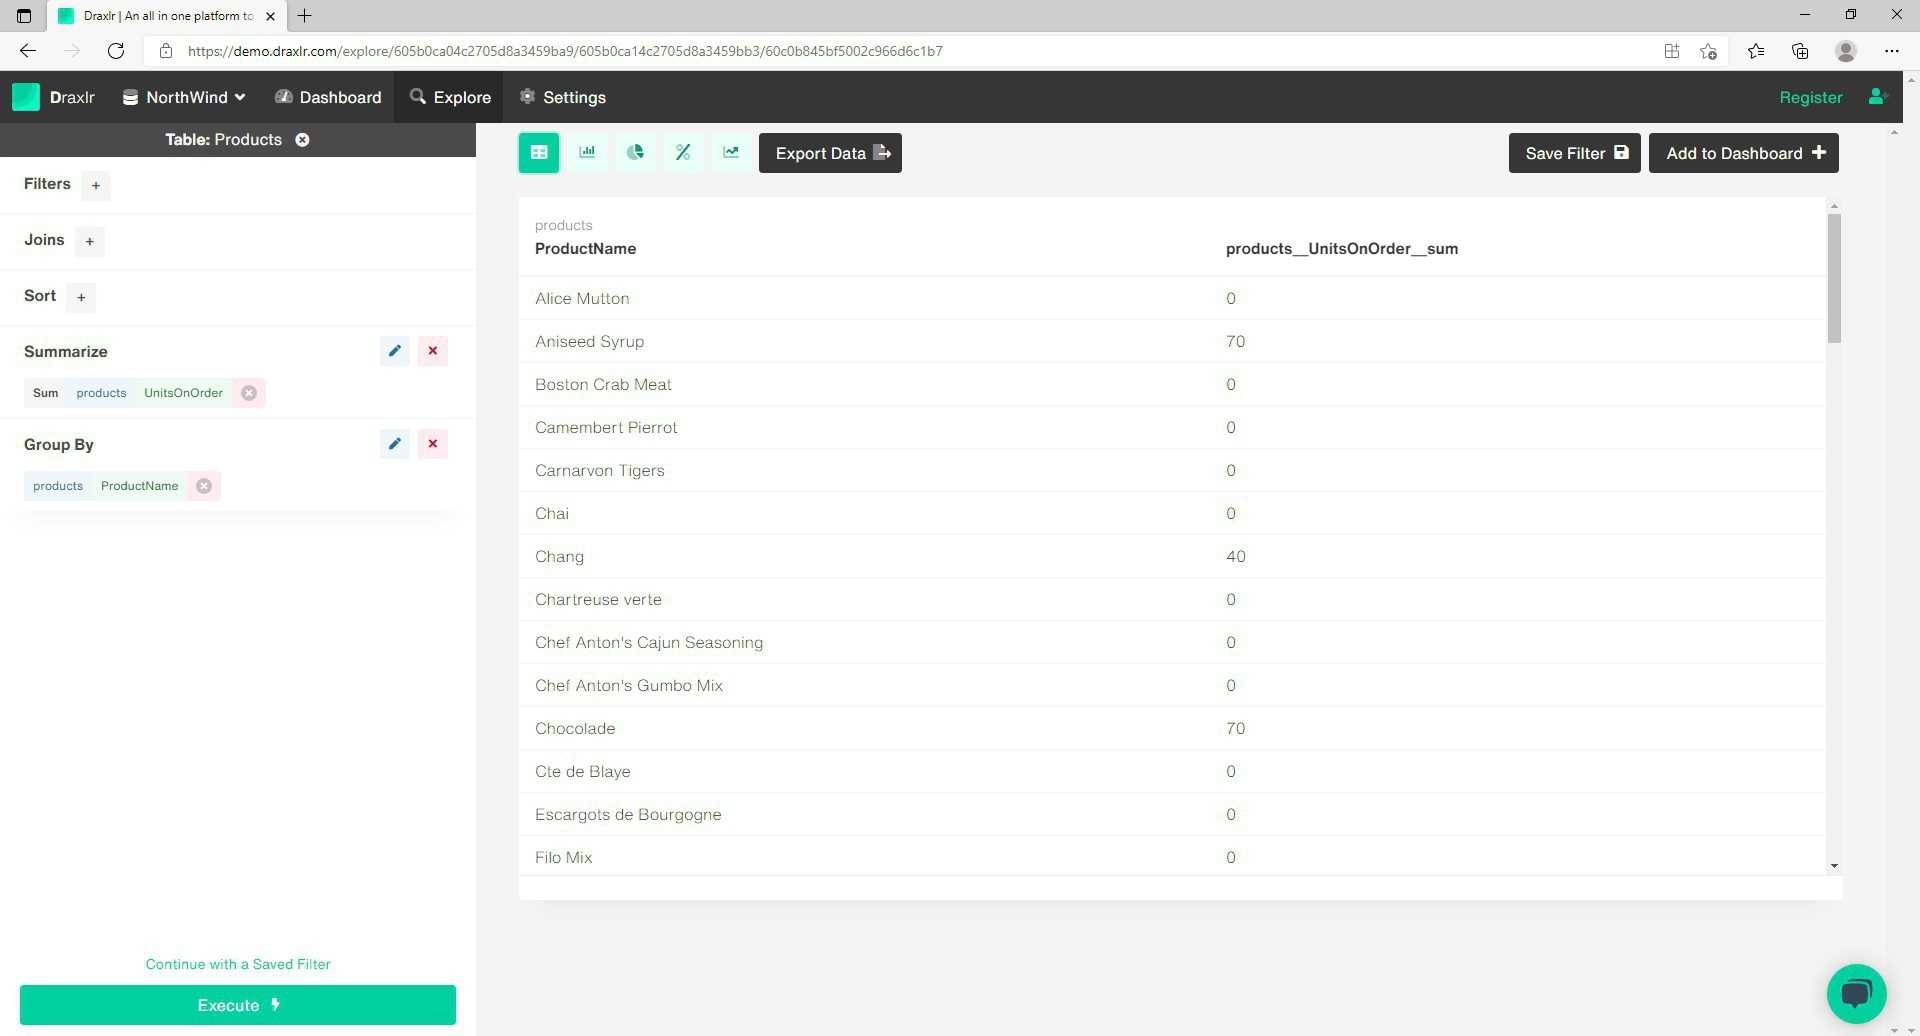
- For this open up the "Add Filter" box, select the "products" table, and set the field to "UnitsOnOrder," operation to ">" and value to "0."
- And you have clean and neat data, represented in a bar graph—ready to be put up on the dashboard.
Step 3 — Saving a Query
Certain queries can be very complex, but have a repetitive need in a business. It is time-consuming to execute such queries over and over again. In such situations, Draxlr can help you build the specific query and save it for future uses. The saved queries can also be put on the dashboard for prompt regular viewing.
- First figure out the query that you are going to need on repetition.
- Say you are looking for a single table to establish a relation between product units ordered and product units in stock, and accordingly contact your product suppliers.
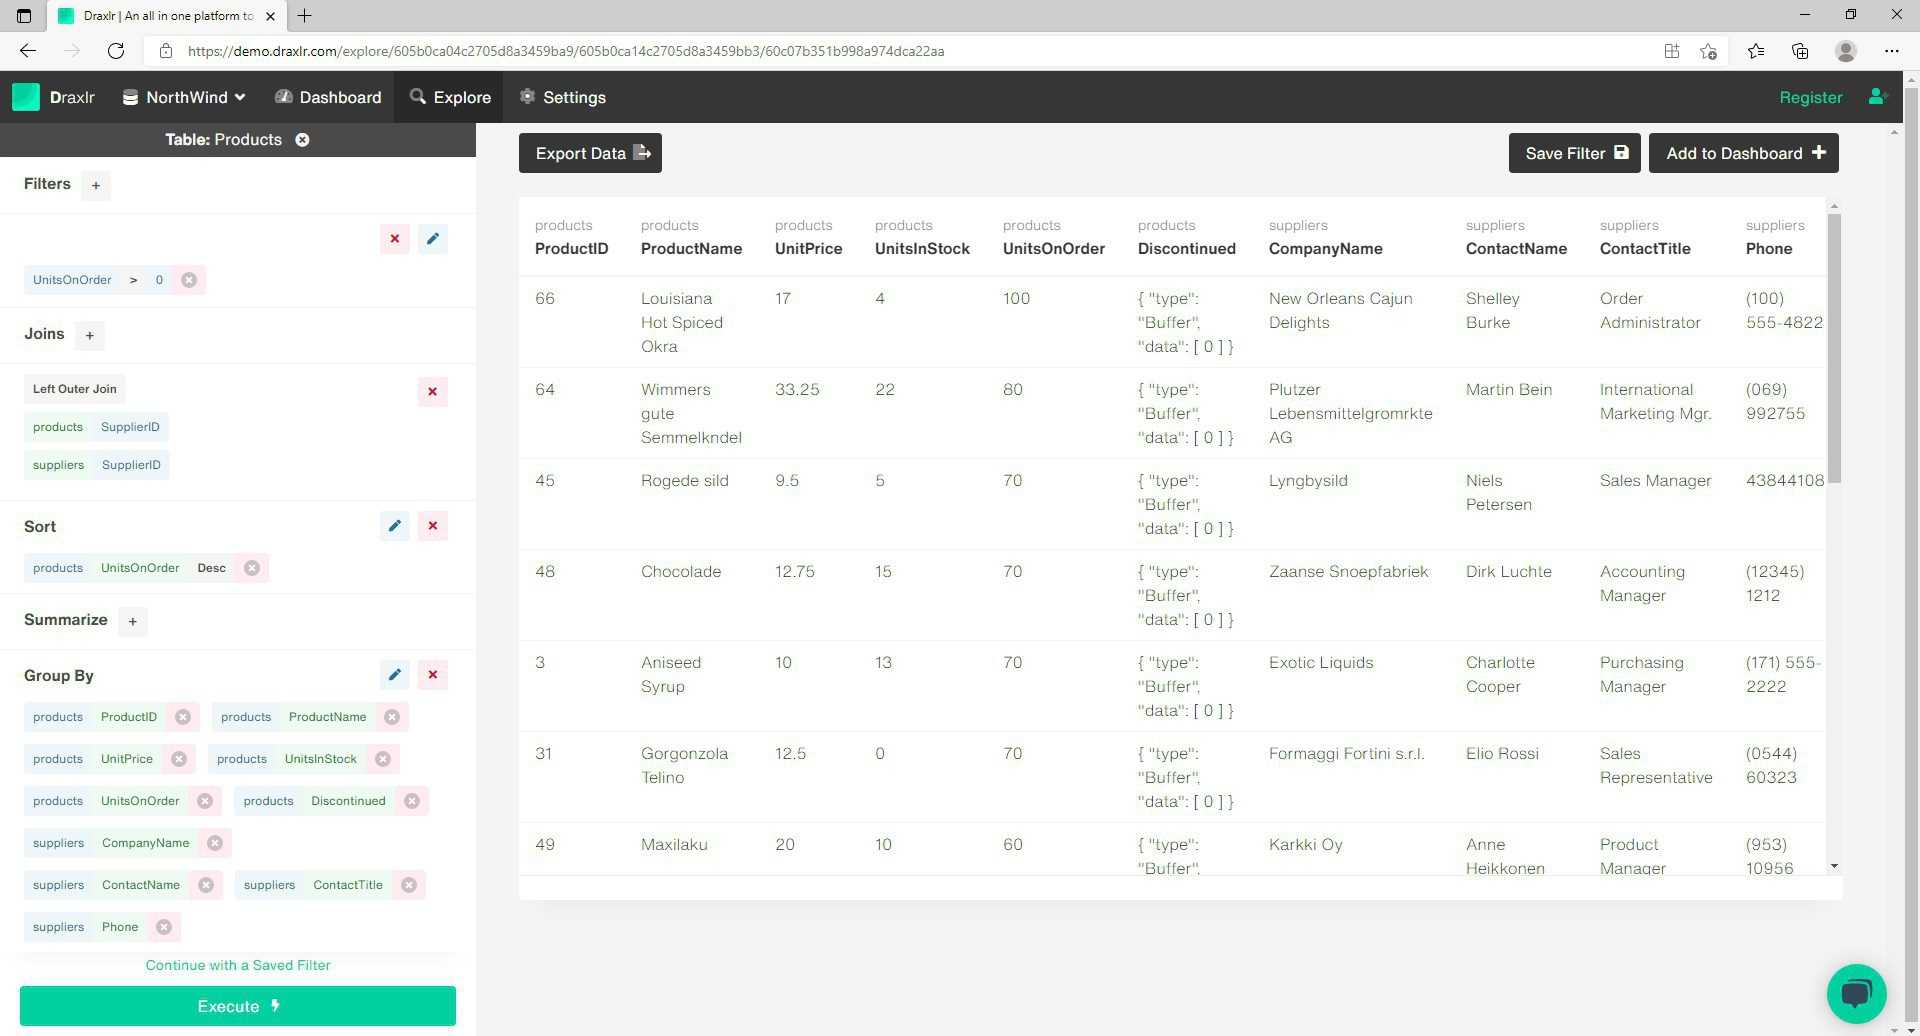
- First Filter out the Products with Zero "UnitsOnOrder." Use the Filter option from the left panel. In the "Add Filter" box, select the table to "products" and set Field to "UnitsOnOrder." Set Operations to ">" and set value "0." Click "Add & execute."
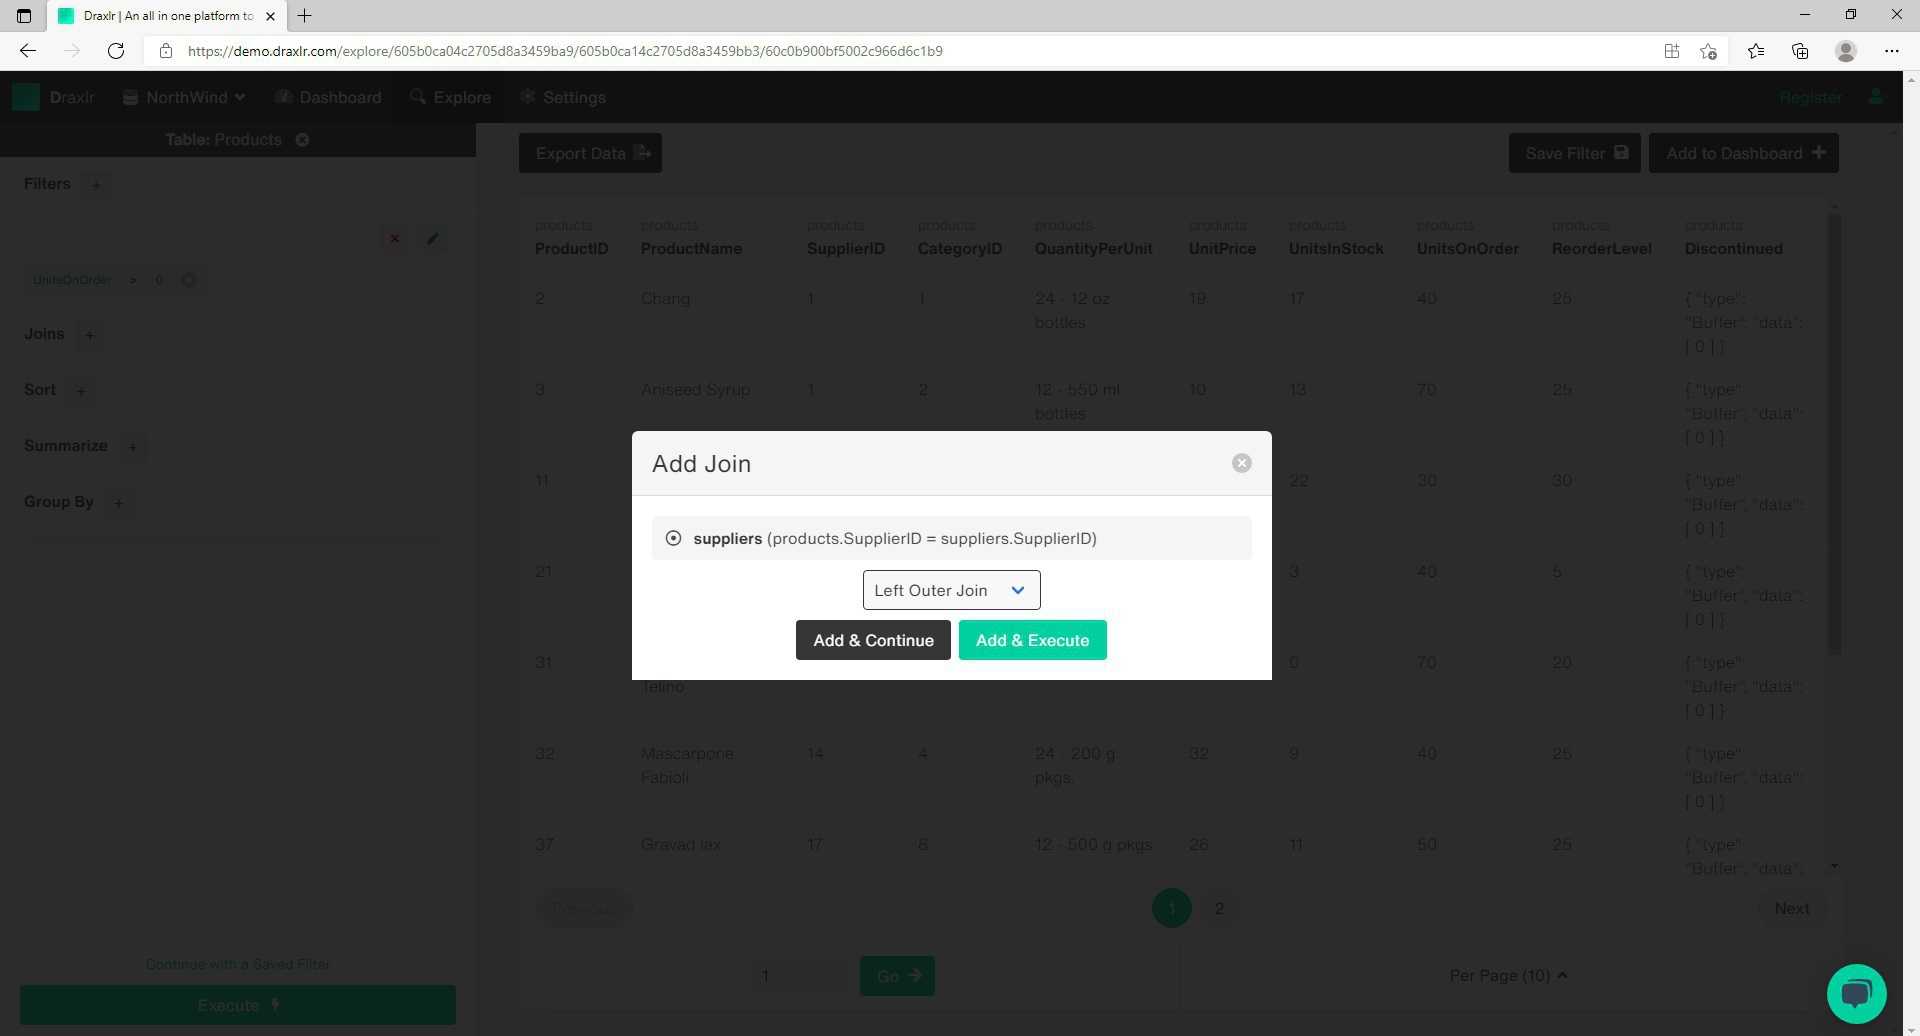
- Now Join the "products" table with the "suppliers" table. Select the Join option from the left panel, and check "suppliers(products.SupplierID = suppliers.SupplierID)" in the "Add Join" box. Select Join type to "Left outer Join."
- Now sort the table to see the Units on order, in descending order. Select sort from the left panel. In the "Add Sort" box, select the "products" table, set the Fields to "UnitsOnOrder" and the order to "Descending." Hit "Add & Execute."
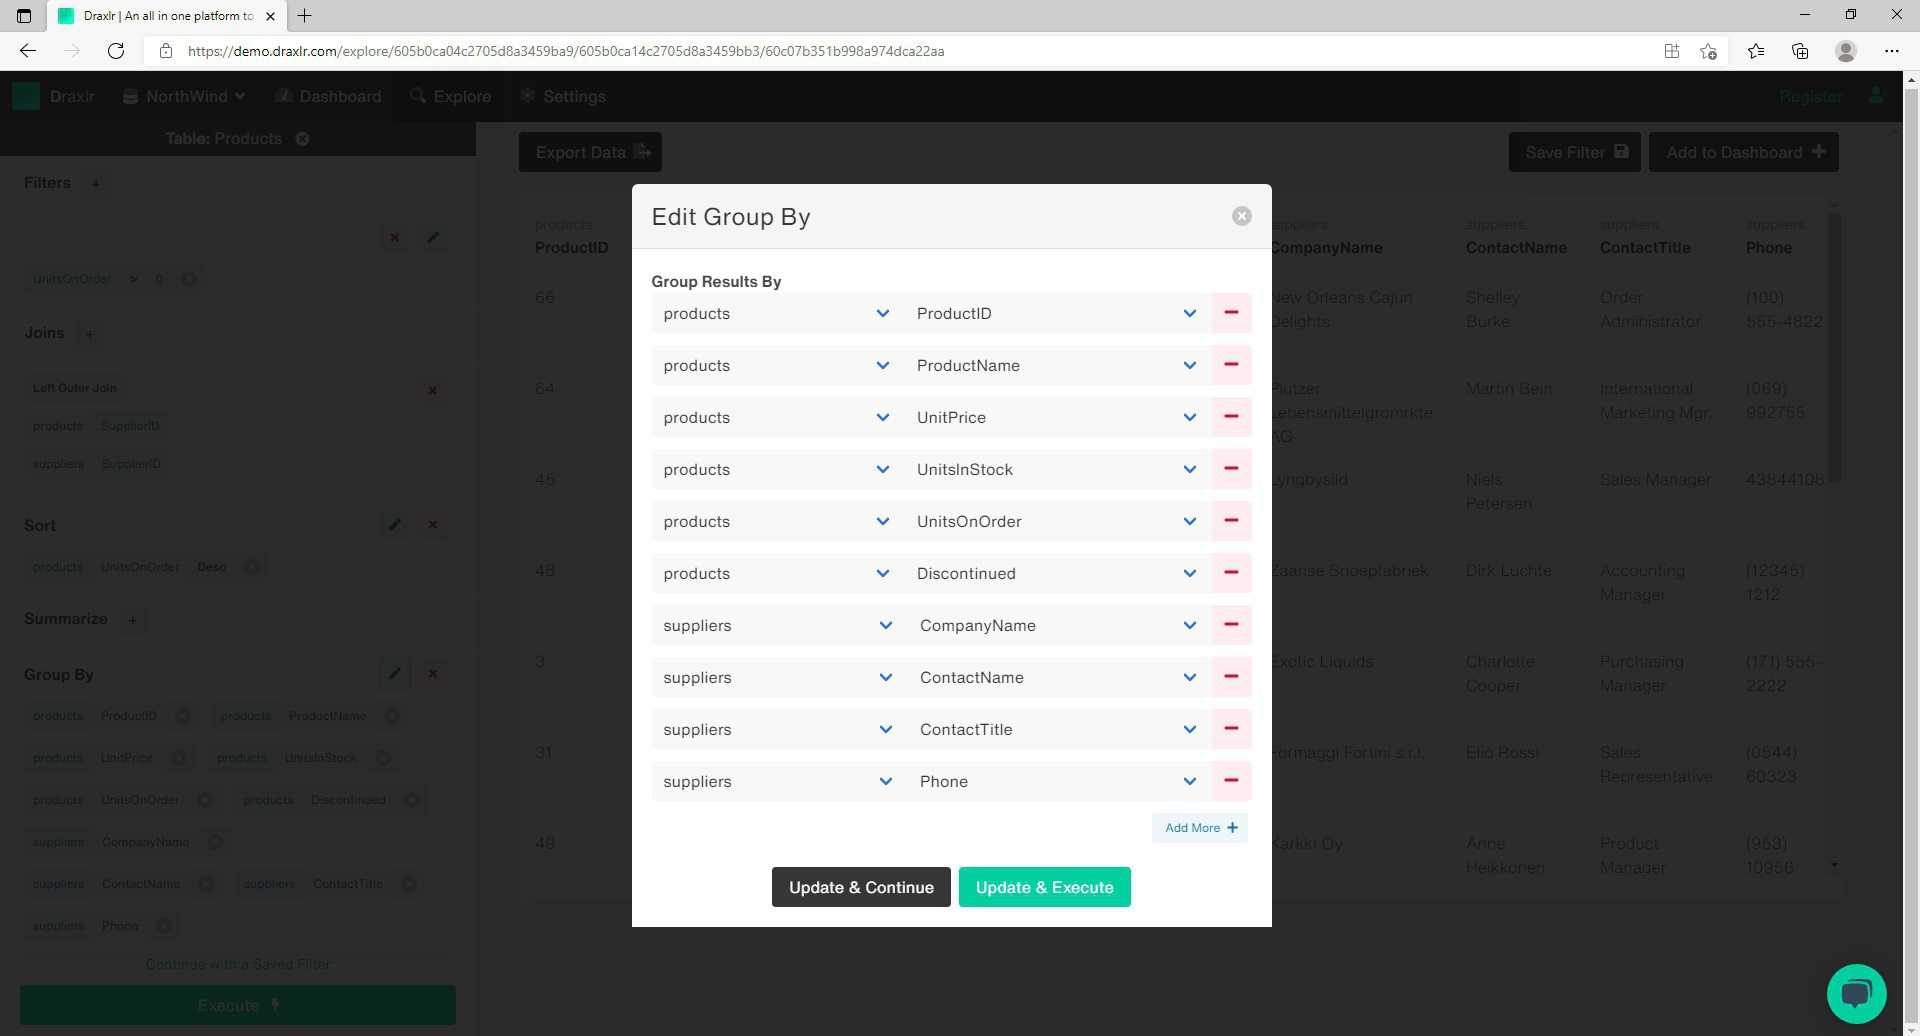
- Finally Group the most relevant information, to make the table less crowded. Open the "Add Group By" box from the left panel, select the "products" table, and set the Field to "ProductID." You will need to group a few more attributes from the "products" table, so hit "Add more." Similarly Keep adding the attributes, "ProductName," "UnitPrice," "UnitsInStock," "UnitsOnOrder," "Discontinued."
- Now similarly keep adding attributes from the "suppliers" table, by selecting "Add more." From the "suppliers" table add the attributes, "CompanyName," "ContactName," "ContactTitle," and "Phone."
- Click "Add & Execute."


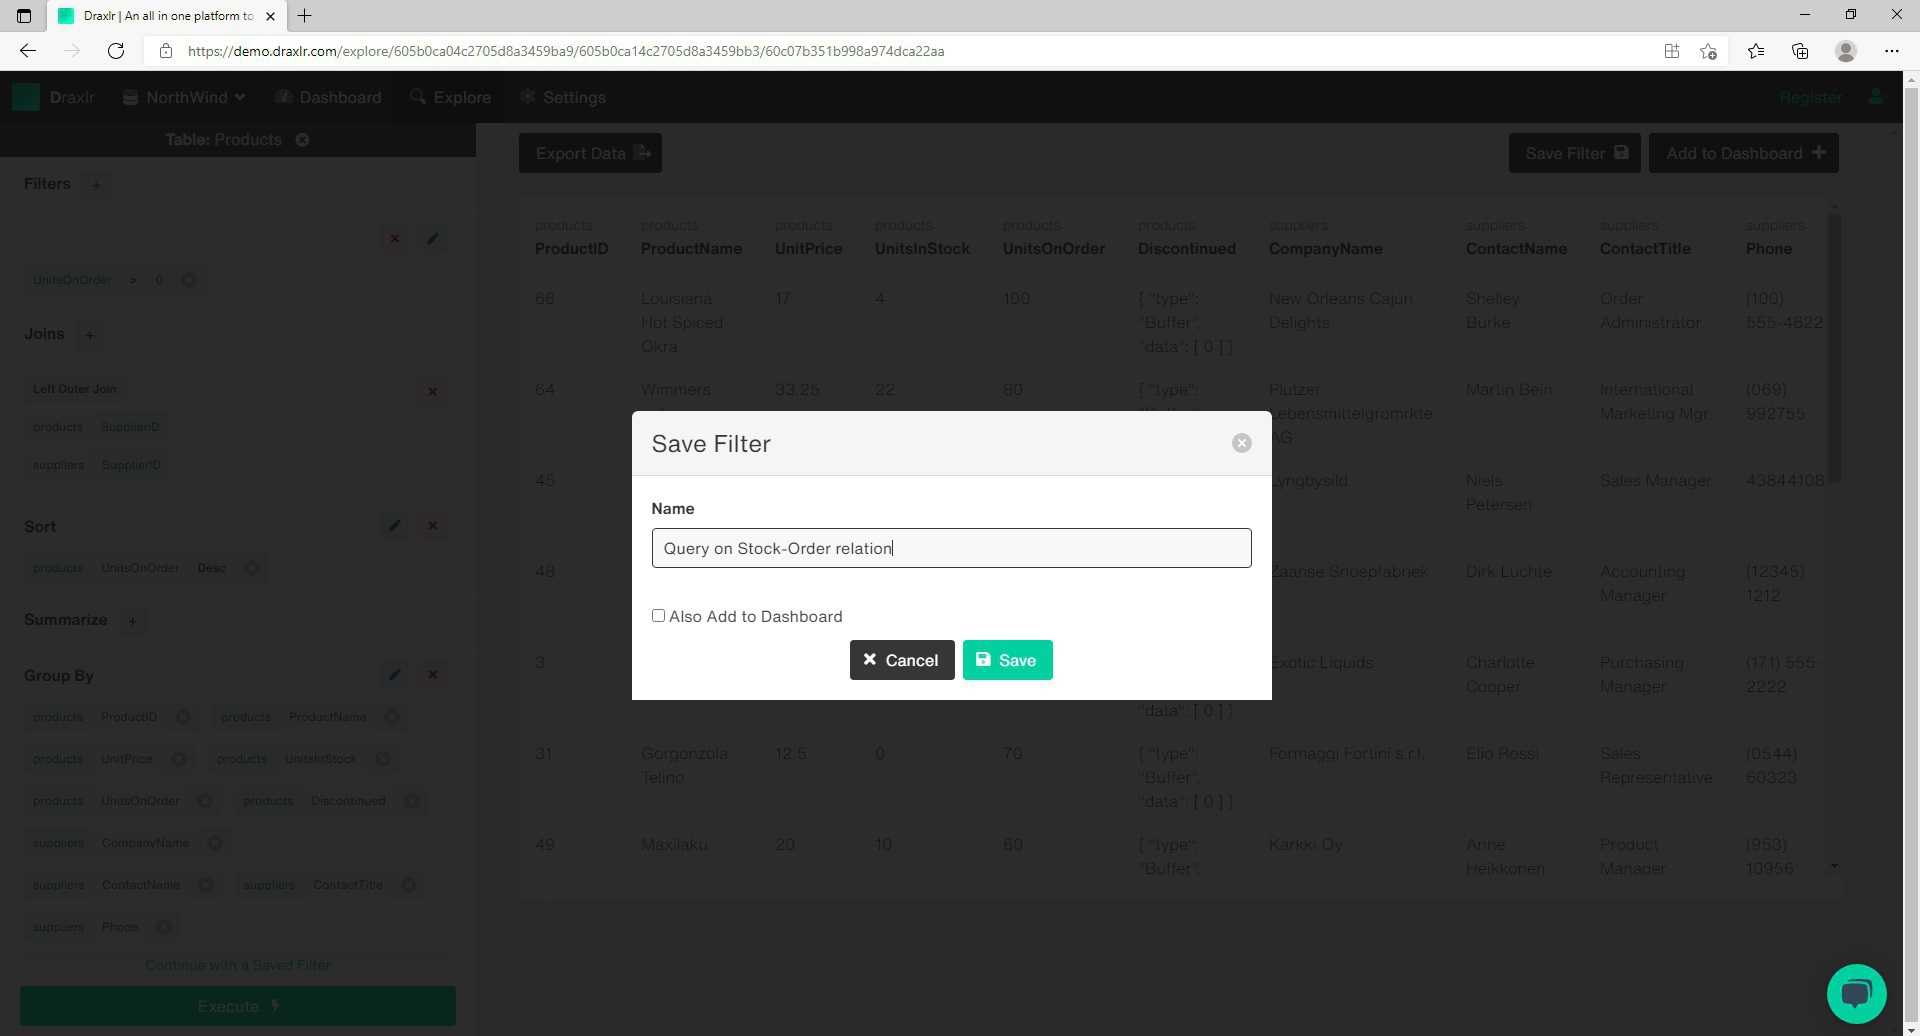
- Now on the top right corner of your workspace, you will find the "Save Filter" button next to the "Add to Dashboard" button.
- The "Save Filter" box appears, asking for the Filter Name. For example, set it to "Query on Stock-Order relation."
- In this box, you also get to Check, Add to Dashboard option. Which will save the query and put the query result on the dashboard.
- For example's sake, let's keep it unchecked, and click on Save.
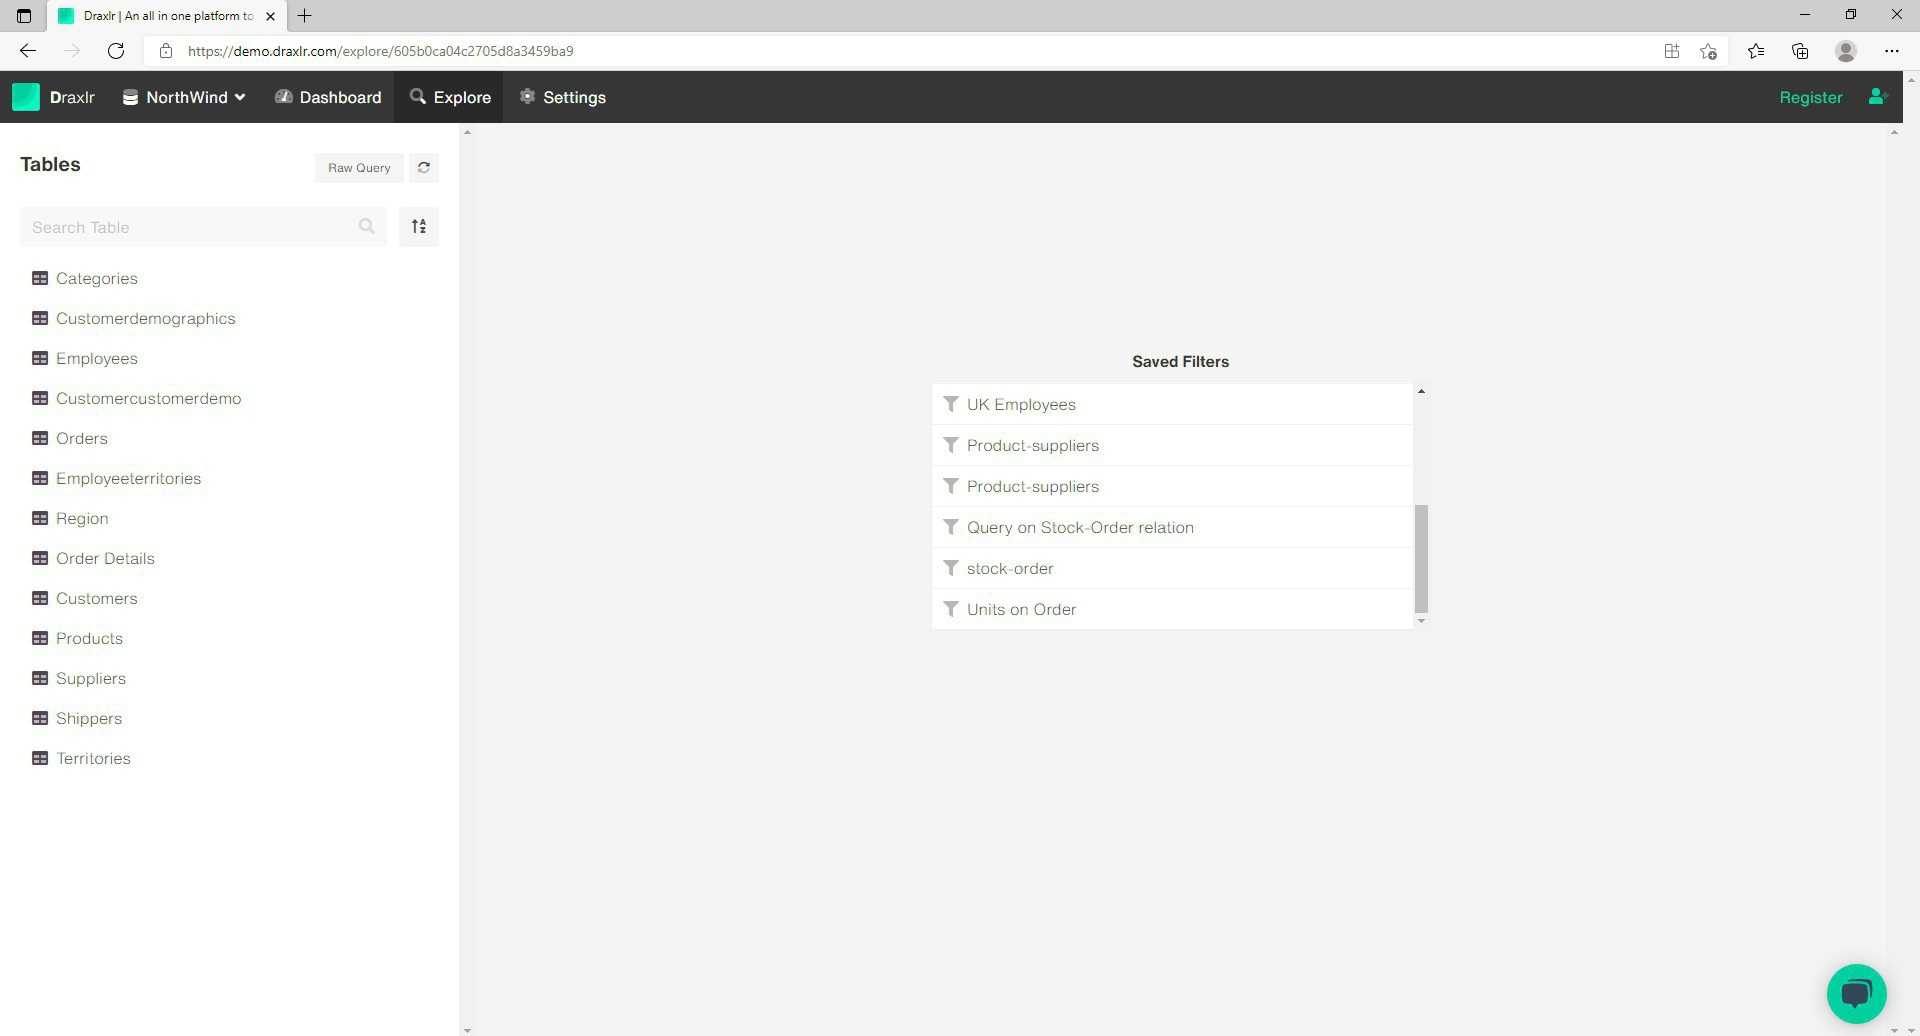
- Now if you exit the products table, you will find the newly saved filter, under "saved filters."
Step 4 — Adding to dashboard
- You can select a saved query and add it to the dashboard, or you can build a new query and add it to the dashboard.
- Select a saved query, in the case of this example, let's select the query we saved in the previous steps.
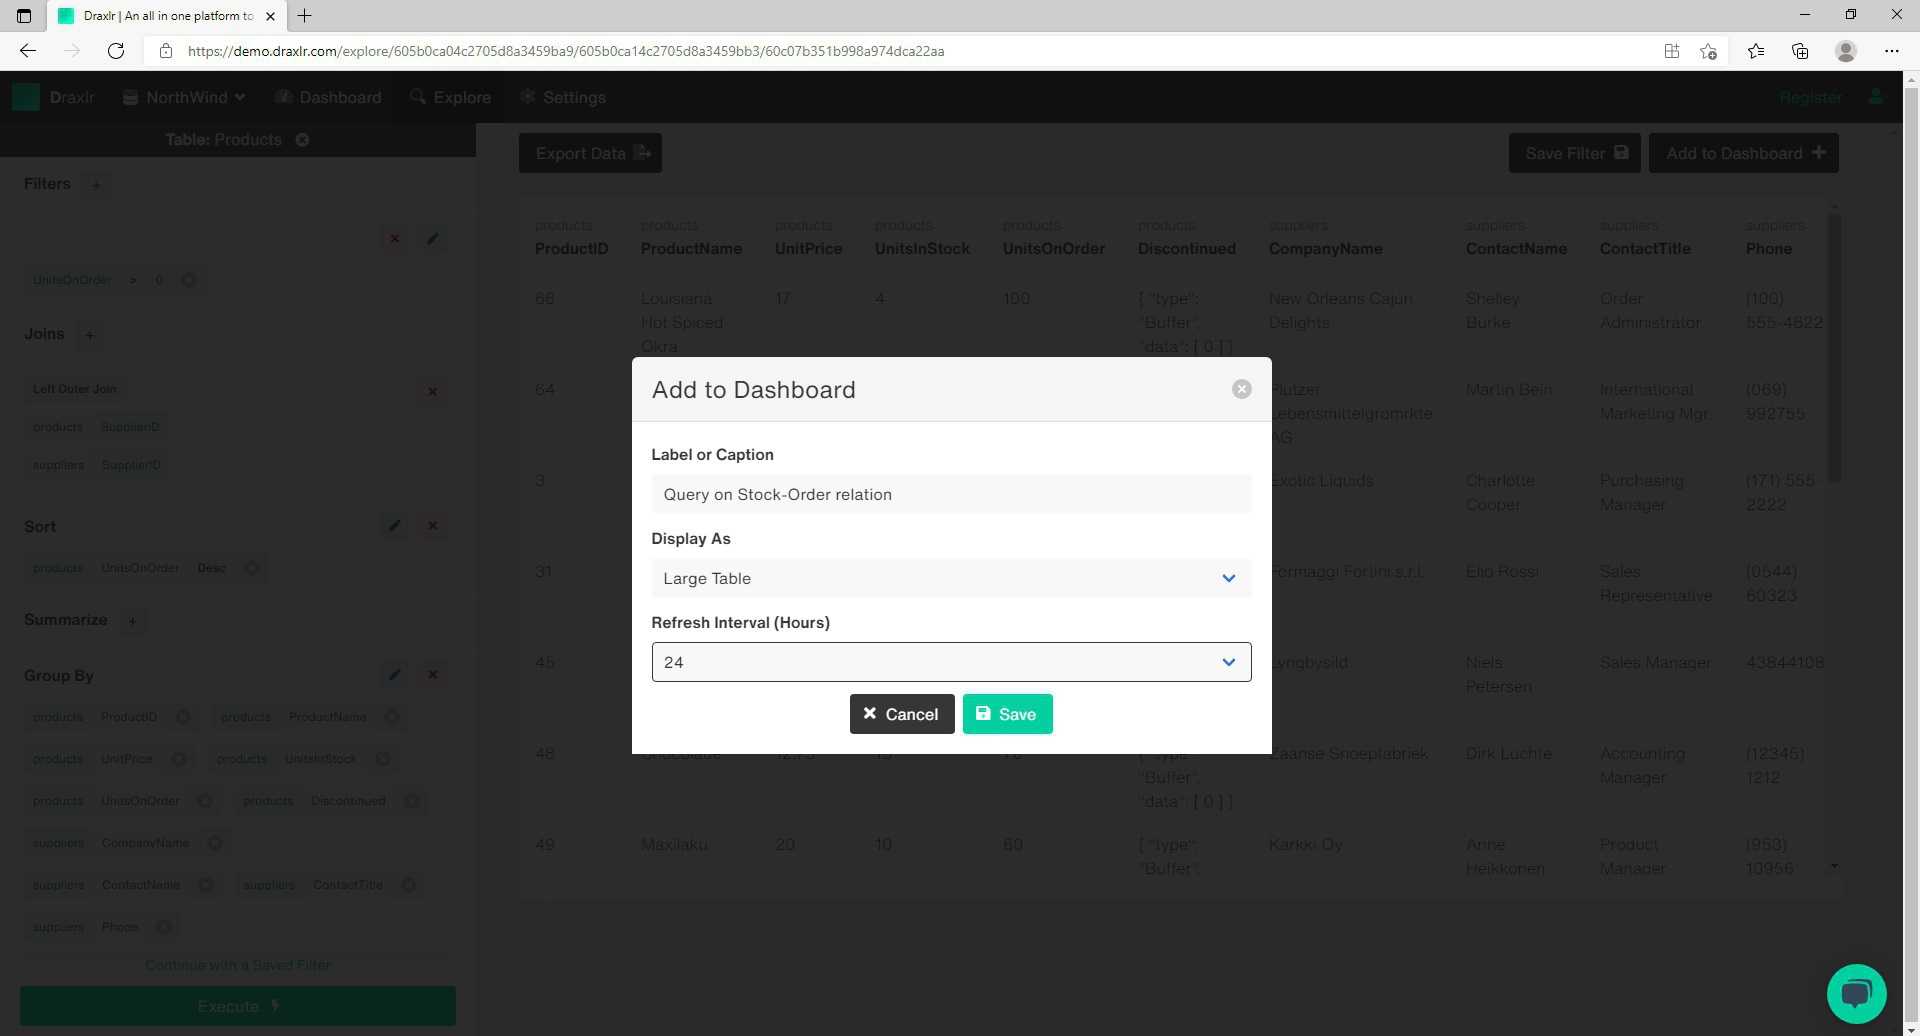
- On the top right-hand corner click on the "Add to Dashboard" button. This will open the "Add to Dashboard" box.
- Set a label, in this case, let's use the Filter title—"Query on Stock-Order relation"
- The data of this query is such that it cannot be viewed in graphical forms, thus you will have to select the "Display as" option to large tables.
- Below it set the "Refresh Interval" to 24 Hours. Depending on your membership, your flexibility over this interval will vary. A flexible refresh interval will prove important while handling data that needs refreshing every 4 or 2 hours.
- Click Save and your query will be put up on the dashboard. On the top right corner you will be prompted with the message "Query successfully saved."
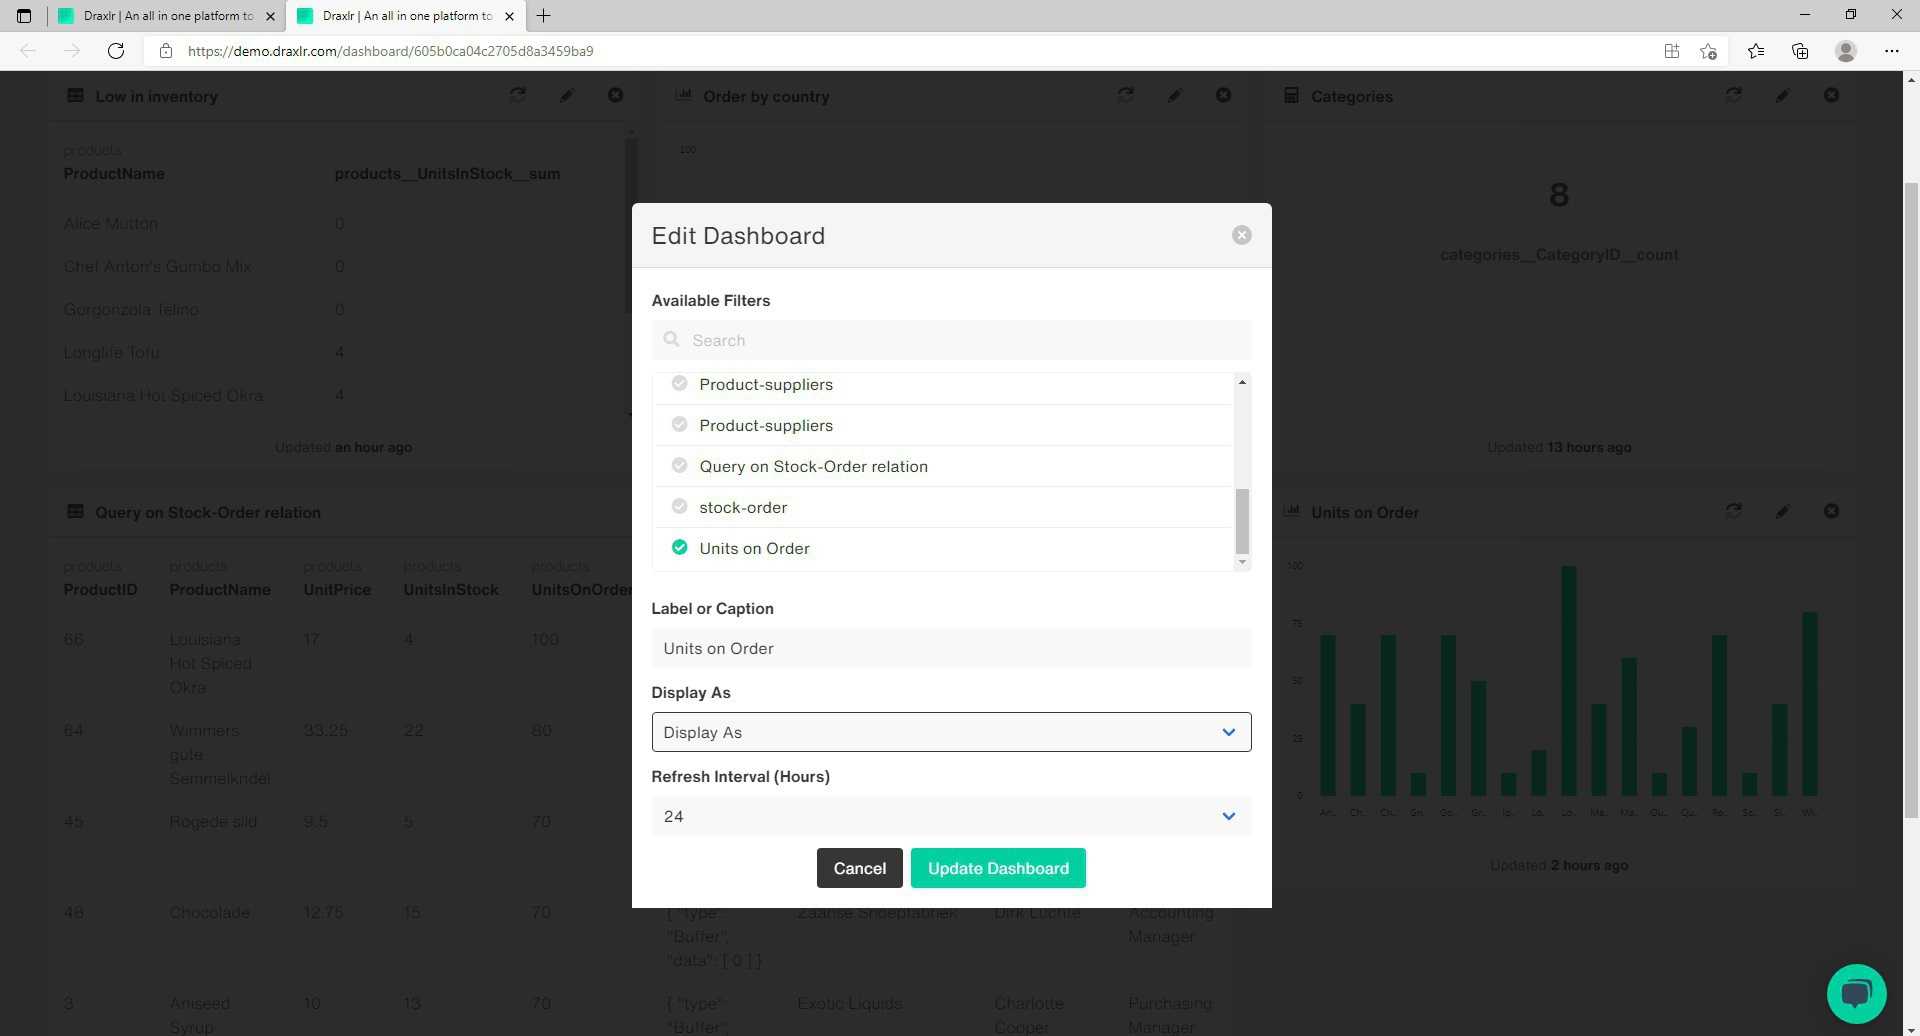
- You can further edit the interval, query and display options of a particular query directly from the Dashboard. For which simply open the dashboard from the Draxlr main toolbar. On the top right corner of your query (on the dashboard), you will find the edit option.
- Let's take another instance to attach data on the dashboard, in bar graph format.
- It is important to note that for the graphical representation of data, the data should be compatible with graphical representation.
- We take the example of one of the previously described queries, where we found the total number of Units on Order per product (from the "products" table.)

- Build the query and Click the "Add to Dashboard" button.
- Set the label, "Units on Order." Below it, set the display graphic to "Bar Graph." Set a relevant "Refresh Interval," and Save.

Maintaining a neat Dashboard
To maintain a dashboard that's neat, organized, informative, and relevant—you will have to strike the right balance between tool implementation and the art of data storytelling. You will have to have the right sense for building appropriate queries for the dashboard and be well acquainted with the Draxlr tools to execute it.
Visualizing your Dashboard in advance is a key factor. Analyze the data thoroughly and see the narrative it presents. Then accordingly select relevant information that highlights the narrative, and add that information to the dashboard.
Spend sufficient time analyzing the data, to see the relations established within different tables and attributes. This will help you build a query that can fetch vital information, which is also compatible with graphical representation.
Finally, do remember to organize your dashboard as you continue your journey. Over time data will accumulate, and you will find the need to add important information to your dashboard. Including new dashboard elements, without re-organizing previous elements, can spoil the image and efficiency of your dashboard. Feel free to update and edit, the display of previous dashboard elements (only if needs be) over time, to maintain a neat and organized dashboard.
- Anubhav De


